Tuesday, March 27, 2018

Hot Cross Buns

I've seen Hot Cross Buns being sold in grocery stores in every grocery store weeks before Easter all my life. I've tasted a few and they were always dry and didn't have any raisins. So when I saw this recipe in Cooks Country, I knew I'd have to make these for us and I'm so glad I did! Dr. Sweetpea was very skeptical initially but it only took one bite for him to be absolutely addicted to these Hot Cross Buns! He took five rolls to work one morning to eat throughout the day!


Hot Cross Buns
(Source: Cooks Country)

BUNS
3/4         cup raisins
2              tablespoons water, plus ¾ cup warm water (110 degrees)
3              large eggs, plus 1 large egg, lightly beaten
6              tablespoons unsalted butter, melted
4              cups (20 ounces) all-purpose flour
1/2         cup (3 1/2 ounces) granulated sugar
2 1/4      teaspoons instant or rapid-rise yeast
1 1/4      teaspoons salt

ICING
1              cup (4 ounces) confectioners' sugar
4              teaspoons milk
1/8         teaspoon vanilla extract
Pinch salt

FOR THE BUNS: Combine raisins and 2 tablespoons water in small bowl; cover and microwave until steaming, about 1 minute. Let sit until softened, about 15 minutes. Drain raisins and discard liquid.

Whisk warm water, 3 eggs, and melted butter together in 4-cup liquid measuring cup. Using stand mixer fitted with dough hook, mix flour, sugar, yeast, and salt on low speed until combined, about 30 seconds. With mixer running, add egg mixture and mix until dough comes together, about 2 minutes.

Increase speed to medium and knead until dough is smooth and elastic, about 10 minutes. Reduce speed to low, add raisins, and knead until combined, about 2 minutes (dough will be sticky and some raisins may not be fully incorporated into dough at this point; this is OK).

Turn out dough and any errant raisins onto lightly floured counter and knead by hand to evenly incorporate raisins into dough, about 1 minute. Form dough into smooth, taut ball; transfer to greased large bowl and cover with plastic wrap. Let rise until doubled in size, 2 to 2½ hours.

Grease 13 by 9-inch baking pan. Turn out dough onto lightly floured counter and divide into 12 equal pieces. Form each piece into rough ball by pinching and pulling dough edges under so that top is smooth. On clean counter, cup each ball with your palm and roll into smooth, tight ball. Arrange in prepared pan in 3 rows of 4 and cover loosely with plastic. Let buns rise until nearly doubled in size and starting to press against one another, 1½ to 2 hours.

Adjust oven rack to middle position and heat oven to 350 degrees. Brush buns with beaten egg. Bake until golden brown and centers register at least 190 degrees, 24 to 26 minutes. Transfer pan to wire rack and let buns cool until just warm, about 1 hour.

FOR THE ICING: Combine all ingredients in bowl until smooth (icing will be very thick). Transfer icing to small zipper-lock bag. Cut off very tip of 1 corner of bag. Pipe continuous line of icing across center of each row of buns, then pipe icing in lines perpendicular to first to form cross in center of each bun. Serve.

Saturday, March 24, 2018

Pear Almond French Tart

I recently went to a baking class where I learned how to bake variety of tarts. My favorite out of all the ones that I learned was the pear tart since I love anything lots and lots of almonds. I was surprised to learn the filling of the tart is made of almond flour and the texture is extremely light. The chef didn't share the recipe with us but I combined a few recipes that I saw online to come up with my own version. This tart is just as good as what I learned in the class and it'll be a keeper. Dr. Sweetpea also loves this tart as much as I do.


Pear Almond Tart
(Sources for various recipes listed below) 

Basic Sweet Tart (Source: Payard Desserts Cookbook)
125 grams unsalted butter
125 grams granulated sugar
1 large egg
250 grams all purpose flour
62 grams almond flour
2.5 grams salt
6 grams cold water

Place the butter and sugar in the bowl of a stand mixer fitted with the paddle attachment and beat on medium speed until smooth, about 2 minutes. Add the egg and mix until blended. Add the flour, almond flour, and salt and mix on low speed until combined. Add the water and mix until just combined. 

Transfer the dough to a work surface and shape into two disks. Wrap each disk in plastic wrap and refrigerate for at least two hours, or for up to 3 days. The dough can be frozen for up to 1 month. 

Almond Cream (Source: Bouchon Bakery Cookbook)
73 grams almond flour
7 grams all purpose flour
73 grams unsalted butter, at room temperature
73 grams powdered sugar
44 grams eggs (it was 1 egg for me) 

Sift the almond flour into a medium bowl; break up any lumps remaining in the sieve and add to the bowl. Add the all-purpose flour and whisk together. 

Place the butter in the bowl of a stand mixer fitted with the paddle attachment and mix on medium-low, warming the bowl as needed, until the butter is the consistency of mayonnaise and holds a peak when the paddle is lifted. Sift in the powdered sugar and mix on the lowest setting until incorporated, then increase the speed to low and mix until fluffy, 2 to 3 minutes. Scrape down the sides and bottom of the bowl. Add the almond mixture in 2 additions, pulsing to combine and then mixing on low speed for 15 to 30 seconds after each one. Scrape the bottom of the bowl to incorporate any dry ingredients that may have settled there. 

Add the eggs and mix on low speed until combined, smooth and holds it's peak, about 30 seconds. 

Pear and Almond Tart recipe (adapted from Epicurious) 
Canned pears in juice
Slivered almonds

Position rack in center of oven and preheat to 375°F. Roll out chilled dough on floured sheet of parchment paper to 12-inch round, lifting and turning dough occasionally to free from paper. Using paper as aid, turn dough into 9-inch-diameter tart pan with removable bottom; peel off paper. Seal any cracks in dough. Trim overhang to 1/2 inch. Fold overhang in, making double-thick sides. Pierce crust all over with fork.

Spread almond filling evenly in crust. Stem pears and cut each in half lengthwise; scoop out cores. Cut each half crosswise into thin slices. Gently press each pear half to fan slices but keep slices tightly overlapped. Slide spatula under pears and arrange atop filling like spokes of wheel with narrow ends in center. Sprinkle slivered almonds over areas that don't have pears. 

Bake tart until golden and tester inserted into center of filling comes out clean, about 55 minutes. Cool tart in pan on rack. Push pan bottom up, releasing tart from pan. (Can be made 8 hours ahead. Let stand at room temperature.) Cut tart into wedges; sprinkle with powdered sugar, if desired, and serve.

(*I used a 6 inch tart pan and baked for 45 minutes)


Friday, March 16, 2018

Ritz Carlton Lemon Pound Cake

I pinned this recipe several years ago but never made it until now. I'm so sad that I waited for so long to make this recipe because it's perfectly lemony and it's amazing with our morning cup of coffee. Dr. Sweetpea raved about how good this cake was and it'll definitely be one that I make for family/friends/neighbors!


Ritz Carlton Lemon Pound Cake
(Source: PlainChicken.com)

3 cups all purpose flour
1 tablespoon baking powder
3/4 teaspoon salt
3 cups sugar
1 cup unsalted butter, room temperature
1/2 cup shortening, room temperature
5 large eggs
1 cup whole milk
6 tablespoons lemon juice
1 lemon, zested

Preheat oven to 350ºF. Spray or butter and flour 2 loaf pans or one large Bundt pan. Sift flour, baking powder and salt into medium bowl.  Set aside. Using an electric mixer, cream together butter, shortening and sugar.  Add eggs one at a time, beating until well blended after each one. Add dry ingredients in three additions to butter mixture alternately with milk, beginning and ending with flour mixture. Beat at low speed just until blended after each addition. Mix in lemon juice and zest. Pour batter into prepared pans.  Bake cakes until tester inserted into center comes out clean, about 55 minutes.  Cool cakes in pans for 15 minutes.  Turn cakes out onto racks and cool completely.

Thursday, March 8, 2018

The Best Banana Bread

This is the best banana bread that I've ever made! It's so good that Dr. Sweetpea ate most of the banana bread in like two days.  It's from the Baking Illustrated cookbook and I'm so glad I found this recipe.

Banana Bread
(Source: Baking Illustrated)

2 cups (10 ounces) all purpose flour
1 1/4 cups walnuts, chopped course
3/4 cup (5 1/4 ounces) granulated sugar
3/4 teaspoon baking soda
1/2 teaspoon salt
3 very ripe bananas, mashed well (about 1 1/2 cups)
1/4 cup plain yogurt
2 large eggs, beaten lightly
6 tablespoons unsalted butter, melted and cooled
1 teaspoon vanilla extract

Adjust oven rack to the lower-middle position and heat oven to 350 degrees. Grease the bottom and sides of a 9x5 inch loaf pan; dust with flour, tapping out the excess. Spread the walnuts on a baking sheet and toast until fragrant, 5 - 10 minutes. Set aside to cool. Whisk the flour, sugar, baking soda, salt, and walnuts together in a large bowl; set aside. Mix the mashed bananas, yogurt, eggs, butter and vanilla with a wooden spoon in medium bowl. Lightly fold the banana mixture into the dry ingredients with a rubber spatula until just combined and the batter looks thick and chunky. Scrape the batter into the prepared loaf pan. Bake until the loaf is golden brown and a toothpick inserted in the center comes out clean, about 55 minutes. Cool in the pan for 5 minutes, then transfer to a wire rack. Serve warm or at room temperature. 


Thursday, March 1, 2018

Tangy Achiote-rubbed Grilled Chicken Tacos

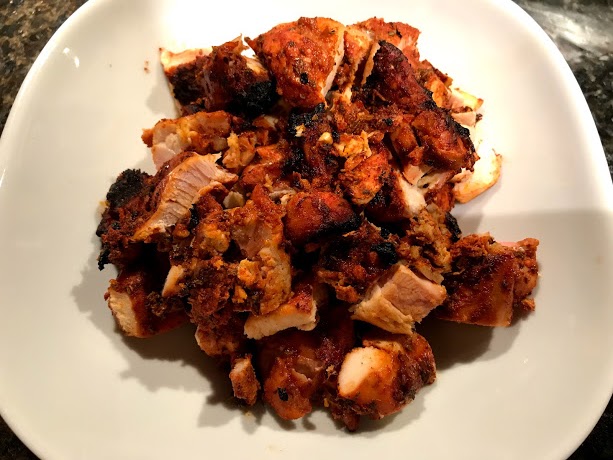
Dr. Sweetpea and I love the chicken burritos from Chipotle. I've been searching for a marinade that I can make at home and taste similar to the chicken that we have at the fast food chain and I found it! It's from the Tacolicious Cookbook and since we live in Houston, it was super easy to find all the ingredients that I need to make this delicious chicken taco. It's definitely a keeper for us!


Tangy Achiote Rubbed Grilled Chicken Tacos
(Source: Tacolicious Cookbook)

2 pounds boneless, skinless chicken thighs
2 tablespoons ground annatto seeds
1/2 teaspoon ground allspice
1/2 teaspoon ground tumeric
2 tablespoons arbol chile powder
2 tablespoons kosher salt
2 tablespoons dried mexican oregano
2 teaspoons agave nectar
4 cloves garlic, crushed
2/3 cup cider vinegar
1/4 freshly squeezed orange juice

Put the chicken in a large, heavy duty zip top plastic bag. In a small bowl, combine the annatto seeds, allspice, tumeric, chile powder, salt, oregano, agave nectar, garlic, vinegar, and orange juice and mix well. Add the spice mixture to the chicken and seal the bag closed. Massage the contents of the bag to coat both sides of the chicken evenly with marinade. Let the chicken marinate in the refrigerator for 2 hours or overnight. Prepare a medium fire for direct heat cooking in a grill. Bring the chicken thighs to room temperature and remove them from the marinade. Place the chicken on the grill rack directly over the fire and cook, turning after about 10 minutes. Cook for another 10 minutes on the other side. If the chicken is starting to burn or cook too quickly, move to a part of the grill with indirect heat and continue to cook. The chicken is done when an instant read thermometer inserted into the thickest part registers 165 degrees. 

Saturday, February 24, 2018

Blueberry Scones with Lemon Glaze

We had a ton of blueberries that were about to go bad in our fridge so I decided to make the best Blueberry Scones with Lemon Glaze. I've had this recipe saved for a while and I'm so sad that I didn't make these until now. Dr. Sweetpea and I devoured these scones with our morning coffee and they were amazing. Definitely a keeper.


Blueberry Scones with Lemon Glaze
(Source: Tyler Florence)

Blueberry Scones:
2 cups all-purpose flour
1 tablespoon baking powder
1/2 teaspoon salt
2 tablespoons sugar
5 tablespoons unsalted butter, cold, cut in chunks
1 cup fresh blueberries
1 cup heavy cream, plus more for brushing the scones

Lemon Glaze:
1/2 cup freshly squeezed lemon juice
2 cups confectioners' sugar, sifted
1 tablespoon unsalted butter
1 lemon, zest finely grated

Preheat the oven to 400 degrees F.

Sift together the dry ingredients; the flour, baking powder, salt, and sugar. Using 2 forks or a pastry blender, cut in the butter to coat the pieces with the flour. The mixture should look like coarse crumbs. Fold the blueberries into the batter. Take care not to mash or bruise the blueberries because their strong color will bleed into the dough. Make a well in the center and pour in the heavy cream. Fold everything together just to incorporate; do not overwork the dough.

Press the dough out on a lightly floured surface into a rectangle about 12 by 3 by 1 1/4 inches. Cut the rectangle in 1/2 then cut the pieces in 1/2 again, giving you 4 (3-inch) squares. Cut the squares in 1/2 on a diagonal to give you the classic triangle shape. Place the scones on an ungreased cookie sheet and brush the tops with a little heavy cream. Bake for 15 to 20 minutes until beautiful and brown. Let the scones cool a bit before you apply the glaze.

You can make the lemon glaze in a double boiler, or for a simpler alternative, you can zap it in the microwave. Mix the lemon juice with the confectioners' until dissolved in a heatproof bowl over a pot of simmering water for the double-boiler method, or in a microwave-safe bowl. Whisk in the butter and lemon zest. Either nuke the glaze for 30 seconds or continue whisking in the double boiler. Whisk the glaze to smooth out any lumps, then drizzle the glaze over the top of the scones. Let it set a minute before serving.

Monday, February 19, 2018

Fresh French Fruit Tart

One of my favorite desserts is the French Fruit Tart. Whenever I go to Central Market here in Houston, I always buy one as a small treat for us. I was browsing recipes online a few days ago to see if I can make one at home and came across the recipe from Pierre Herme's, who is a world renowned French Pastry Chef. I knew I had to try his recipe and bought the ingredients to make the tart at home. The only change made was using the America's Test Kitchen filling recipe but I found on their website. The tart was absolutely amazing and it'll be our go to tart recipe. Dr. Sweetpea kept raving about how it tasted just like the tarts we buy from Central Market.


Pierre Herme's French Fresh Fruit Tart
(Source: Whipped The Blog)

Pierre Herme’s Vanilla Pastry Cream
Fills one 9 or 10 inch tart
2 cups whole milk
1 most, plump vanilla bean, split lengthwise and scraped
6 large eggs yolks
1/2 cup sugar
1/3 cup cornstarch, sifted
3 1/2 Tablespoons unsalted butter, at room temperature

In a small saucepan, bring milk and vanilla bean (pulp and pod) to a boil over medium heat. Cover the pan and turn off heat and let rest to infuse vanilla for 10 minutes.

Fill a large bowl with ice cubes and water. Set aside smaller bowl that can hold the finished cream and be placed in the ice bath. Set aside fine mesh strainer with it.

Whisk the yolks, sugar and cornstarch together in a heavy-bottomed medium saucepan. Remove vanilla bean pod from hot milk. Slowly drizzle some milk into yolks, whisking continuously. Still whisking, pour in all the liquid in a steady stream. Place the pan over medium heat and whisking vigorously without stopping, bring mixture to a boil. Keep at boil while whisking for 1-2 minutes. Remove from heat and scrape pastry cream into the small bowl in put it in the ice bath.

Stir the pastry cream continuously as it cools to keep it smooth. When it is about 140 degrees (very warm to the touch but not extremely hot) stir in butter in 3 or 4 additions. Return to ice bath and leave until cooled. Use immediately or cover with plastic wrap and store in the fridge for up to 2 days.

America's Test Kitchen Pastry Cream (this is the filling that I used but will try Pierre Herme's recipe next time) 

2              cups half-and-half
1/2           cup granulated sugar
pinch table salt
5              large egg yolks
3              tablespoons cornstarch
4              tablespoons unsalted butter (cold), cut into 4 pieces
1 1/2        teaspoons vanilla extract

Heat half-and-half, 6 tablespoons sugar, and salt in medium heavy-bottomed saucepan over medium heat until simmering, stirring occasionally to dissolve sugar. Meanwhile, whisk egg yolks in medium bowl until thoroughly combined. Whisk in remaining 2 tablespoons sugar and whisk until sugar has begun to dissolve and mixture is creamy, about 15 seconds. Whisk in cornstarch until combined and mixture is pale yellow and thick, about 30 seconds. When half-and-half mixture reaches full simmer, gradually whisk simmering half-and-half into yolk mixture to temper. Return mixture to saucepan, scraping bowl with rubber spatula; return to simmer over medium heat, whisking constantly, until 3 or 4 bubbles burst on surface and mixture is thickened and glossy, about 30 seconds. Off heat, whisk in butter and vanilla. Transfer mixture to medium bowl, press plastic wrap directly on surface, and refrigerate until cold and set, at least 3 hours or up to 48 hours.

Pierre Herme’s Sweet Tart Dough
Makes 3 tarts

2 1/2 sticks (285g) unsalted butter (at room temperature)
1 1/2 cups (150g) confectioners’ sugar
1/2 cup lightly packed (100g / 3 ¼ oz) finely ground almond powder
1/2 tsp salt
1/2 tsp pure vanilla extract
2 large eggs, lightly beaten, at room temperature
3 1/2 cups (490g / 17¼ oz) all-purpose flour, sifted

Place the butter in the bowl of a mixer with paddle attachment and beat until creamy, scraping down the edges as needed. Add the sugar almond powder, salt, vanilla and eggs and still working on low speed, beat to blend the ingredients, scraping sides as needed. (dough may look curdled, that is okay)
With the machine on low, add the flour in three parts and mix until the dough mixture starts to get together. Do not over mix – stop when the dough comes together in a soft ball, just a matter of seconds.
Remove the sweet pastry dough and divide into thirds, shape each third into a ball and flatten it slightly and then wrap in plastic wrap. If using the dough immediately, let it settle in the fridge for at least 2 hours or overnight. To freeze, put the wrapped disks in freezer bag and use within a month. (When starting from the frozen pastry disks, thaw about 45 minutes before the dough is ready for rolling out.)

To roll and bake the tart, butter a 9 or 10 inch tart pan. Lightly flour a surface and a rolling pin, then roll out the pastry disk, working it in each direction to ease the shape into a circular shape between 1/16 and 1/8 inch thick. Carefully lay the rolled dough over the tart dish. With your fingers, gently ease the dough into the corners and up the sides. If the shell cracks, use scraps to patch. Use the rolling pin or knife to cut off excess edges. Prick the surface all over with a fork. Line the shell with parchment or foil and fill with dried beans or rice. Bake the crust at 350 degrees for 18-20 minutes until it is lightly colored. Remove the parchment or foil and beans and bake an additional 2-3 minutes to firm up the bottom. (I baked our crust for about 10 more minutes). Cook tart on a rack.


TO ASSEMBLE THE TART

Pour the pastry cream into the cooked tart shell. Top with sliced fruit of your choice. If you want to glaze the fruit, combine 1/2 c. fruit juice (pineapple, peach, etc.), 1/4 c. sugar and 2 tbsp. cornstarch in saucepan, stirring until smooth. Cook, stirring constantly, until mixture thickens and boils. It should be clear. Remove from heat; cool until lukewarm. Spoon over fresh fruit on top of the tart. (*I used water instead of fruit juice to make the glaze)

Tuesday, February 6, 2018

Chili Mac

One of my favorite meals when I lived in the dorms during college was chili mac. I remember it used to show up in the cafeteria once every two weeks in the fall/winter months and I'd always look at the menu that was posted online to see if it was being served. It seriously was my favorite comfort foods as a college kid. Anyway, it was unusually cold in Houston for the last few days and I started craving chili mac for dinner. I decided to try the America's Test Kitchen recipe and it was amazing! Totally hit the spot on a cold day. Dr. Sweetpea was also a fan of this meal so this is definitely going in our dinner rotation. 


Chili Mac
(Source: America's Test Kitchen)

Salt
1/2         pound elbow macaroni (about 2 cups uncooked pasta)
3              tablespoons vegetable oil
1 1/2      pounds 85 percent lean ground beef
2              medium onions, chopped medium
1              red bell pepper, stemmed, seeded, and chopped medium
6              medium garlic cloves, minced or pressed through a garlic press
2              tablespoons chili powder
1              tablespoon ground cumin
1              (14.5-ounce) can diced tomatoes
1              (28-ounce) can tomato puree
1              tablespoon light or dark brown sugar
8              ounces Colby Jack cheese, shredded (about 2 2/3 cups)

Adjust an oven rack to the middle position and heat the oven to 400 degrees. Bring 4 quarts of water to a boil in a Dutch oven over high heat. Stir in 1 tablespoon salt and the macaroni; cook until al dente, about 5 minutes. Reserve ¾ cup of the pasta water and drain the pasta. Transfer the pasta to a bowl and set aside.

Wipe the Dutch oven dry. Add 1 tablespoon of the oil and return to medium-high heat until shimmering. Add the beef and cook, breaking up the pieces with a wooden spoon, until it is no longer pink and beginning to brown, 5 to 8 minutes. Drain the beef through a colander, discarding the drippings, and set it aside.

Add the remaining 2 tablespoons oil to the Dutch oven and return to medium-high heat until shimmering. Add the onions, red pepper, garlic, chili powder, and cumin; cook, stirring occasionally, until the vegetables are softened and beginning to brown, about 7 minutes. Add the diced tomatoes, tomato puree, brown sugar, the reserved pasta water, and the drained beef; bring to a simmer and cook, stirring occasionally, until the flavors have melded, about 20 minutes.

Stir in the cooked pasta and season with salt and pepper to taste. Pour into a 9 by 13-inch baking dish (or a shallow casserole dish of similar size) and sprinkle with the cheese. Bake until the cheese is melted and browned, about 15 minutes. Cool for 5 to 10 minutes before serving.

Thursday, February 1, 2018

Potato Leek Soup

Dr. Sweetpea has been craving Potato Leek Soup for some time. So I started google recipes online and came across the Potato Leek Soup recipe by Once Upon a Chef. I've tried several of her recipes already and they all turned out amazing, so I knew this one would be a hit too. Dr. Sweetpea said this soup was the best Potato Leek Soup that he's ever had and so this recipe is also a keeper recipe in our household.


Potato Leek Soup
(Source: Once Upon a Chef) 

3 tablespoons unsalted butter
4 large leeks, white and light green parts only, roughly chopped (about 5 cups)
3 cloves garlic, peeled and smashed
2 pounds Yukon Gold potatoes, peeled and roughly chopped into 1/2-inch pieces
7 cups low sodium chicken or vegetable broth
2 bay leaves
3 sprigs fresh thyme
1 teaspoon salt
1/4 teaspoon ground black pepper
1 cup heavy cream
Chives, finely chopped, for serving

Melt the butter over medium heat in a large soup pot. Add the leeks and garlic and cook, stirring regularly, until soft and wilted, about 10 minutes. Adjust the heat as necessary so as not to brown.
Add the potatoes, stock, bay leaves, thyme, salt and pepper to pot and bring to a boil. Cover and turn the heat down to low. Simmer for 15 minutes, or until the potatoes are very soft. Fish out the thyme sprig and bay leaves, then purée the soup with a hand-held immersion blender until smooth. (Alternatively, use a standard blender to purée the soup in batches; see note.) Add the heavy cream and bring to a simmer. Taste and adjust seasoning with salt and pepper. If soup is too thin, simmer until thickened. If it's too thick, add water or stock to thin it out. Garnish with fresh herbs if desired.

Saturday, January 20, 2018

Soft and Chewy Oatmeal Cookies

If you've been following my blog this whole time, then you'll know that Dr. Sweetpea loves loves LOVES Oatmeal Chocolate Chip Cookies. Whenever I say I'm in a mood to bake, he'll always request Oatmeal Chocolate Chip Cookies. This brings me to my next point, I hoard all sorts of OCC recipes just so I can try new ones out because Dr. Sweetpea loves them. I came across this recipe a few weeks ago and it was a massive hit. The cookies were soft, chewy, and absolutely addicting!


Soft and Chewy Oatmeal Chocolate Chip Cookies
(Source: justsotasty.com)

1 1/3 cup all-purpose flour
3/4 teaspoon baking soda
1/2 to 1 teaspoon cinnamon ,to taste
1/4 teaspoon salt
3/4 cup unsalted butter ,melted and cooled to room temperature
3/4 cup packed brown sugar
1/2 cup granulated sugar
1 tablespoon honey
1 tablespoon vanilla
1 large egg
2 1/4 cups old-fashioned oats
1 1/4 cup chocolate chips , your favorite kind
1/2 cup chopped walnuts , optional but recommended

In a large bowl whisk together the flour, cinnamon, baking soda & salt. In a separate bowl beat together the melted butter and sugars using an electric mixer. Add in the honey, vanilla and egg and continue beating until combined. Turn the mixer down to low and beat in the flour mixer until almost combined. Add in the oats and beat on medium speed until combined. Then turn off the mixer and stir in 1 cup of the chocolate chips and the chopped walnuts. Form the dough into balls of about 1/4 cup . Flatten slightly, set on a plate and cover with clingfilm. Refrigerate for at least 2 hours. When you're ready to bake, preheat the oven to 350F degrees. Line your baking sheets with parchment paper or a silicone baking mat and place the cookies at least 2 inches apart. Bake for 12-14 minutes until the tops of the cookies look almost set. Remove from the oven and dot the tops of the cookies with the remaining 1/4 cup of chocolate chips. Allow to cool on the cookie tray for 10 minutes before transferring to a wire rack to continue cooling.


Wednesday, January 17, 2018

Soy Mustard Glazed Salmon

This is another fantastic salmon recipe for an easy weeknight meal. It's very similar to the Pomegranate Balsamic Glazed salmon recipe that I posted several posts ago but with a different glaze. Dr. Sweetpea loved this meal and it will remain in our regular dinner rotation.


Soy Mustard Glazed Salmon
(Source: America's Test Kitchen)

1              teaspoon light brown sugar
1/2         teaspoon kosher salt
1/4         teaspoon cornstarch
4              center-cut skin-on salmon fillets, 6 to 8 ounces each (see note)
Ground black pepper
1              teaspoon vegetable oil

Adjust oven rack to middle position and heat oven to 300 degrees. Combine brown sugar, salt, and cornstarch in small bowl. Pat salmon dry with paper towels and season with pepper. Sprinkle brown sugar mixture evenly over top of flesh side of salmon, rubbing to distribute.

Heat oil in 12-inch ovensafe nonstick skillet over medium-high heat until just smoking. Place salmon, flesh side down, in skillet and cook until well browned, about 1 minute. Using tongs, carefully flip salmon and cook on skin side for 1 minute.

Remove skillet from heat and spoon glaze evenly over salmon fillets. Transfer skillet to oven and cook until center of thickest part of fillets registers 125 degrees on instant-read thermometer and is still translucent when cut into with paring knife, 7 to 10 minutes. Transfer fillets to platter or individual plates and serve.

Soy Mustard Glaze

3              tablespoons light brown sugar
2              tablespoons soy sauce
2              tablespoons mirin
1              tablespoon sherry vinegar
1              tablespoon whole grain mustard
1              tablespoon water
1              teaspoon cornstarch
1/8           teaspoon red pepper flakes

Whisk ingredients together in small saucepan. Bring to boil over medium-high heat; simmer until thickened, about 1 minute. Remove from heat and cover to keep warm.

Tuesday, January 16, 2018

Shish Tawook

Dr. Sweetpea and I LOVE Lebanese food. I was introduced to it when we were living in Chicago and there was this fabulous Lebanese restaurant that had amazing food. If I could eat without gaining any weight, I'd eat there every day. Anyway, I was browsing around Pinterest in bed one morning and came across this Shish Tawook recipe. It's similar to chicken kebabs but more garlicy, plus, it's meat on a stick. Who doesn't love meat on a stick?! Seriously! I bought the ingredients right away, let it marinade in the fridge for a few days, and grilled it after I got home from work for our dinner and it was fabulous! Dr. Sweetpea ate the chicken wrapped in pita bread and veggies and loved it. This is definitely a keeper recipe in our household.


Shish Tawook
(Source: curiouscuisiniere.com)

2 lb chicken breast, cut into 1-1 ½ inch pieces
For the Marinade
1 lemon, juiced (roughly 1/4 cup)
6 garlic cloves, minced
1/4 cup plain yogurt or Greek yogurt
2 tablespoons olive oil
1 teaspoon ground thyme
1 teaspoon paprika
1 teaspoon salt
2 teaspoon tomato paste
1/4 tsp ground black pepper

In a small bowl, mix all the marinade ingredients together. Place the cubed chicken into a flat, sealable container and pour the marinade over the chicken. Mix the chicken with the marinade to be sure all the pieces are well-coated. Cover the container and let marinate in the refrigerator for at least 4 hours, up to overnight. Preheat your grill to a medium heat, roughly 350F. Thread the chicken pieces onto the soaked skewers, pressing the pieces up against each other. Grill the chicken skewers for 8-10 minutes a side, until the chicken is firm and golden. Serve the shish tawook with pita bread and sliced tomatoes or with rice and grilled vegetables.


Saturday, January 13, 2018

Slow Roasted Spiced Pork

Before heading home for Christmas, I watched an episode of Barefoot Contessa where Ina Garten made this delicious looking Slow Roasted Spiced Pork for dinner. I emailed the recipe to myself and made a mental note that I would make for us after the holidays. Dr. Sweetpea loved that I was making slow roasted pork but was skeptical about the spice mixture until he started to smell the pork roasting away in the oven. It took a long time to cook but it was totally worth the wait. Dr. Sweetpea RAVED about how good the pork turned out. In fact, after we ate most of the leftovers a few days later, I tried to toss the little bit of pork out but Dr. Sweetpea dove right into the garbage can and shoved the little piece of pork into his mouth. It's. That. Good. 

Slow Roasted Spiced Pork
(Source: Ina Garten)

1 (7- to 9-pound) bone-in pork butt with a layer of fat on top
6 garlic cloves
1 large yellow onion, chopped
1 jalapeno pepper, ribs removed, seeded, and chopped
1/4 cup chopped fresh oregano leaves
1 1/2 tablespoons ground cumin
1 1/2 teaspoons chipotle chile powder
Kosher salt and freshly ground black pepper
1 1/2 tablespoons apple cider vinegar
1/4 cup good olive oil
1 (750 ml) bottle dry white wine, such as Pinot Grigio
Lime wedges, for serving

Preheat the oven to 300 degrees F. Test your oven with an oven thermometer to be sure it's accurate!

Score the fat on the pork diagonally with a sharp knife in a crosshatch pattern. With a small paring knife, make a dozen 1/2-inch-deep cuts in the top and sides of the pork to allow the seasonings to permeate the meat.

Place the garlic, onion, jalapeno, and oregano in a food processor and process until the ingredients are finely chopped. Add the cumin, chile powder, 1 tablespoon salt, and 1 1/2 teaspoons pepper and process for 30 seconds to make a paste. Add the vinegar and olive oil and process to incorporate. Rub the mixture all over the pork, including the sides and the bottom, and place the pork in a large roasting pan, fat side up. Pour 2 cups of the wine into the pan and cover the whole roasting pan tightly with aluminum foil. Roast for 2 1/2 hours, remove the foil, and roast for another 4 to 4 1/2 hours, until the meat is very, very tender when tested with a carving fork. Every 2 hours, add another cup of wine to keep some liquid in the pan.

Remove the pan from the oven, cover it tightly with aluminum foil, and allow the meat to rest for 15 to 30 minutes. Slice, sprinkle with salt, and serve with lime wedges on the side.

Wednesday, January 10, 2018

Thai Massaman Curry

When we lived in Minneapolis, there was this fabulous Thai restaurant where I ordered Massaman Curry all. the. time. I was absolutely addicted to the peanut flavored curry and I'd literally eat every drop of the sauce. I haven't found a place that makes Massaman curry that well in Houston yet but I attempted to make it myself and home and it turned out AMAZING. Dr. Sweetpea had two servings in one sitting and all the left overs were gone the next day. This is definitely a keeper in our household!


Thai Massaman Curry
(Source: Life Made Simple Bakes.com) 

2 tbsp. olive oil, coconut oil or vegetable oil
1/2 yellow onion, diced
3 russet potatoes, peeled and cut into 1/2-inch cubes
3 carrots, peeled and sliced into 1/8-inch thick slices
2 cans (13.5 oz) coconut milk
1 1/2 c. low-sodium chicken broth
3 tbsp. smooth peanut butter
2 tbsp. brown sugar
2 tbsp. lime juice
1 tbsp. fish sauce
1 tbsp. red curry paste
1 (4 oz) can massaman curry
1 lb. chicken breasts, thinly sliced
1/2 c. chopped roasted peanuts

In a large skillet or dutch oven set over medium heat, add the oil. When the oil is hot, saute the onion until tender. Add the carrots and potatoes, cook for 5 minutes. Pour in the coconut milk and chicken broth, bring mixture to a simmer. Add peanut butter, brown sugar, lime juice, fish sauce and curry pastes, mix to combine. Let the potatoes and carrots simmer for 10 minutes, then add the sliced chicken. Continue cooking for an additional 10-15 minutes or until the vegetables are tender and the chicken is fully cooked. Remove from the heat, serve over freshly cooked white or brown rice. Garnish with additional peanuts, sliced lime and thai basil, if desired.

Saturday, January 6, 2018

Pork with Mushroom Sauce

Back in December, I watched Ina Garten on make her Filet Mignon with Mustard and Mushrooms and immediately made a mental note that I'd have to make that for Dr. Sweetpea after the holidays when we're back in Houston. Since Filet Mignon tends to be pricey, I substituted bone-in pork chops and they still turned out amazing. I think the sauce is really what makes this meal over the top but it's super easy, tasty, and perfect to serve when you have guests over. Dr. Sweetpea kept raving about how good his meal is. 


Pork with Mushroom Sauce
(Source: Ina Garten) 

2 (2-inch-thick) filets mignons, tied (10 to 12 ounces each)
1 tablespoon canola oil
2 1/2 teaspoons fleur de sel
1 teaspoon coarsely cracked black peppercorns
1 tablespoon unsalted butter
6 ounces cremini mushrooms, stemmed and sliced 1/4 inch thick
1 tablespoon dry sherry
Kosher salt and freshly ground black pepper
2 teaspoons good olive oil
1/4 cup minced shallots
1 1/2 tablespoons Cognac or brandy
3/4 cup heavy cream
2 tablespoons Dijon mustard
1/4 teaspoon whole-grain mustard
1 tablespoon minced fresh parsley leaves

Preheat the oven to 400 degrees F. Be sure your stove is well ventilated!

Heat a large (10-inch) cast-iron skillet over high heat for 5 to 7 minutes. Pat the filets dry with paper towels and brush all over with the canola oil. Combine the fleur de sel and cracked pepper on a small plate and roll the filets on the top, bottom and sides in the seasoning, pressing lightly to coat. When the skillet is very hot, add the filets and sear evenly all over (top, bottom and sides) for about 2 minutes per side.

Transfer the steaks from the skillet to a sheet pan (set the skillet aside) and place in the oven for 8 to 12 minutes, until the steaks register 120 degrees F on a meat thermometer for medium rare. Remove from the oven, cover the sheet pan tightly with aluminum foil and allow to rest for 10 minutes.

Meanwhile, heat the butter in a medium (8-inch) saute pan over medium-low heat. Add the mushrooms and saute for 4 to 5 minutes, until they release their juices. Stir in the sherry and cook for 10 to 12 minutes, until the mushrooms are cooked through. Sprinkle with 1/4 teaspoon kosher salt and 1/8 teaspoon pepper and set aside.

At the same time, add the olive oil to the cast-iron skillet (don’t wipe it out), add the shallots and cook over medium-low heat for 2 minutes. Add the Cognac, stirring to deglaze the skillet, and cook for 2 minutes, until the Cognac evaporates and the shallots are tender. Stir in the cream and simmer for 4 to 5 minutes, until thickened. Stir in the two mustards and taste for seasonings.

Remove the strings from the filets and place on a platter. Spoon the mustard sauce around the filets. Spoon the mushrooms on top of the filets and sprinkle with parsley. Serve hot.