Sunday, January 25, 2015

Chili Con Queso Pasta

One of my least favorite things to do during the week is to slave over the stove to cook dinner after work. So I absolutely love meals that can be prepared in 1 hour or less during the work week. I recently purchased Rachael Ray's 365 No Repeat cookbook off of amazon and decided to try this Chili Con Queso pasta recipe. Simply put, if you're addicted to Chili Con Queso like I am, you will LOVE this dish! It's cheesy, spicy, meaty, and super easy to throw together for an easy midweek meal. I actually brought leftovers to work for lunch the next day and it tastes just as good.


Chili Con Queso Pasta
(Source: Rachel Ray)

1 Pound Dried Penne Pasta
1 1/2 Pounds Ground Beef
1 Tablespoon Dried Ground Cumin
1 Tablespoon Dried Ground Coriander
2 Tablespoons Dried Chili Powder
1/4 Teaspoon Black Pepper
1 Large Yellow Onion, Chopped
4-6 Large Cloves Garlic, Chopped
1 Jalapeno Pepper, Seeded and Finely Chopped
2 Tablespoons Butter
2 Tablespoons All Purpose Flour
2 Cups Milk
2 1/2 Cups Sharp Cheddar Cheese, Shredded
1/4 Cup Fresh Cilantro, Chopped
1 (14 Ounce) Can Fire Roasted Tomatoes

Preheat the broiler to high and position the rack 8 inches from the heat. Bring a large pot of water to a boil.  Salt the boiling water and cook the pasta al dente. While the water is coming to a boil, preheat a large skillet over medium-high heat and brown the hamburger.  When the hamburger is almost finished, but still a little pink, throw in the garlic, jalapeño, and onions and finish cooking until the burger is browned and the onion is translucent.  Drain the grease from the skillet and mix in the cumin, coriander and chili powder and pepper.  Take off the heat or turn heat down low. In a medium sauce pot (and you can do this while you're browning the hamburger), melt the butter and add the flour to it.  Cook for 1 to 2 minutes over moderate heat and then whisk in the milk. When the milk comes to a bubble, stir in the cheese, cilantro and parsley with a wooden spoon.  When the cheese has melted, stir in the tomatoes. Once the pasta is cooked, drain it and add it back into the large pot.  Add the contents of the hamburger and all of the Cheddar sauce, and stir to combine.  Transfer to a baking dish, sprinkle with a bit more cheese if you wish, and place under the broiler to lightly brown.

My Favorite Salad

This is a salad that I have gotten addicted to over the last couple of weeks. It's very similar to a salad served at a local pizza place here in the twin cities but for the fraction of the price. Plus, it has a generous serving of prosciutto mixed in, so that is always a win in my book.


Spring Greens with Prosciutto, Parmesan, and Toasted Pecans

1 package of fresh spring greens
Prosciutto slices, chopped up
Freshly shaved Parmesan cheese
Toasted Pecans
Balsamic Vinaigrette 

Toss the spring greens with prosciutto slices, Parmesan cheese, pecans, and drizzle some balsamic dressing on top before serving. 


Friday, January 23, 2015

Blondies

I've never met a chocolate chip cookie that I didn't love. So when someone told me that blondies are like chocolate chip cookies but in a bar form and chewy like a brownie, I HAD to make some for myself. I found this blondie recipe in my Americas Test Kitchen cookbook and was not disappointed with the end results. Perfectly chewy, chocolatey, caramel flavor from the brown sugar, and the pecans added a nutty touch. These bars will definitely be in our regular cookie rotation.


Blondies
(Source: Americas Test Kitchen)

Vegetable cooking spray
1 1/2 cups (7 1/2) ounces unbleached all-purpose flour
1 teaspoon baking powder
1/2 teaspoon salt
12 tablespoons (1 1/2 sticks) unsalted butter, melted and cooled
1 1/2 cups (10 1/2 ounces) firmly packed light brown sugar
2 large eggs
1 1/2 teaspoons vanilla
1/2 cup semisweet chocolate chips
1/2 cup white chocolate chips (I used semisweet chocolate chips)
1 cup pecans, toasted and coarsely chopped

Adjust an oven rack to the middle position and heat the oven to 350 degrees. Line a 13×9-inch baking pan with 2 pieces of foil. Coat the foil-lined pan with vegetable cooking spray. In a medium bowl, whisk the flour, baking powder and salt together. Set aside. In a medium bowl, whisk the melted butter and brown sugar together until combined. Add the eggs and vanilla and mix well. Using a rubber spatula, fold the dry ingredients into the egg mixture until just combined. Do not overmix. Fold in the semisweet and white chocolate chips and the nuts, and turn the batter into the prepared pan, smoothing the top with a rubber spatula. Bake until the top is shiny and cracked and feels firm to the touch, for 22 to 25 minutes. Place the pan on a rack and let cool completely (about an hour). Cut into 1 1/2- by 2-inch bars.

Tuesday, January 20, 2015

Chicken Tikka Masala

Dr. Sweetpea and I absolutely LOVE Indian food. We used to go to Indian restaurant buffets together when we lived in Chicago and we have gone to a couple here in Minneapolis. I always always ALWAYS devour their Chicken Tikka Masala like nobodies business. Seriously, the creamy, spicy, sauce with the big tender pieces of chicken is one of my favorite comfort foods. So imagine my delight when I found this amazing Chicken Tikka Masala recipe online. Super easy to make at home and tastes very similar to the stuff I have eaten at restaurants. This is definitely keeper in our household.


Chicken Tikka Masala
(Source: Bon Appetit)

6 garlic cloves, finely grated
4 teaspoons finely grated peeled ginger
4 teaspoons ground turmeric
2 teaspoons garam masala
2 teaspoons ground coriander
2 teaspoons ground cumin
1 1/2 cups whole-milk yogurt (not Greek)
1 tablespoon kosher salt
2 pounds skinless, boneless chicken breasts, halved lengthwise
3 tablespoons ghee (clarified butter) or vegetable oil
1 small onion, thinly sliced
1/4 cup tomato paste
6 cardamom pods, crushed
2 dried chiles de árbol or 1/2 teaspoons crushed red pepper flakes
1 (28 ounce) can whole peeled tomatoes (I used tomato sauce)
2 cups heavy cream (I used 1 cup instead of 2 cups)
3/4 cup chopped fresh cilantro plus sprigs for garnish

Combine garlic, ginger, turmeric, garam masala, coriander, and cumin in a small bowl. Whisk yogurt, salt, and half of spice mixture in a medium bowl; add chicken and turn to coat. Cover and chill 4-6 hours. Cover and chill remaining spice mixture. Heat ghee in a large heavy pot over medium heat. Add onion, tomato paste, cardamom, and chiles and cook, stirring often, until tomato paste has darkened and onion is soft, about 5 minutes. Add remaining half of spice mixture and cook, stirring often, until bottom of pot begins to brown, about 4 minutes. Add tomatoes with juices, crushing them with your hands as you add them. Bring to a boil, reduce heat, and simmer, stirring often and scraping up browned bits from bottom of pot, until sauce thickens, 8-10 minutes. Add cream and chopped cilantro. Simmer, stirring occasionally, until sauce thickens, 30-40 minutes.
Meanwhile, preheat broiler. Line a rimmed baking sheet with foil and set a wire rack inside sheet. Arrange chicken on rack in a single layer. Broil until chicken starts to blacken in spots (it will not be cooked through), about 10 minutes. Cut chicken into bite-size pieces, add to sauce, and simmer, stirring occasionally, until chicken is cooked through, 8-10 minutes. Serve with rice and cilantro sprigs.


Sunday, January 11, 2015

Roasted Garlic Mashed Potatoes and Meatloaf

Every once in a while, Dr. Sweetpea asks me to make meatloaf for him. I've never been a fan of it because it always seems very bland and it never really appeals to  me. Then I came across this Brown Sugar Meatloaf and it had some amazing reviews and decided to give it a try. I was absolutely blown away by how delicious it turned out. More importantly, the recipe gave me an opportunity to use leftover saltine crackers from when I was making holiday cookies. This is definitely staying in our "make again" recipe list. I served this with a side of Roasted Garlic Mashed potatoes too.


Brown Sugar Meatloaf
(Source: All Recipes)

1/2 cup packed brown sugar
1/2 cup ketchup
1 – 2 teaspoons ground mustard powder (my addition, optional)
1 1/2 pounds lean ground beef
3/4 cup milk
2 eggs
1 1/2 teaspoons salt
1/4 teaspoon ground black pepper
1 small onion, chopped
1/4 teaspoon ground ginger
3/4 cup finely crushed saltine cracker crumbs

Preheat oven to 350 degrees F (175 degrees C). Place aluminum foil on top of a cookie sheet and lightly grease. In a small blow, mix together the brown sugar, ketchup, and mustard powder, set aside. In a mixing bowl, mix thoroughly all remaining ingredients and shape into a loaf. Place on top of the cookie sheet lined with aluminum foil.
Bake for about 40 minutes and spread the ketchup glaze on top of the meatloaf. Bake for another 20 minutes or until the juices run clear.

Roasted Garlic Mashed Potatoes
(Source: The Neelys)

1 head garlic
Olive oil
2 pounds red potatoes, washed well and quartered
Salt and freshly ground black pepper
5 tablespoons butter
3/4 cup heavy cream (I used half and half)

Preheat oven to 425 degrees F. Slice off the very top of the garlic head. Drizzle head with olive oil and wrap in foil. Place on a sheet tray and bake until tender and fragrant, roughly 35 minutes. Remove from the oven and let cool. Remove the cloves and mash with a wooden spoon. Place potatoes in a large stockpot and cover with cold water. Add salt and bring to a boil. Cook until fork tender and drain. Mash the potatoes until smooth.
Meanwhile heat butter and cream until butter melts. Add the roasted garlic and potatoes and mash all together. Taste and season with salt and pepper. Serve immediately. 

Sunday, January 4, 2015

Chewy Oatmeal Chocolate Chip Cookies

Dr. Sweetpea has been asking me to bake some Oatmeal Chocolate Chip cookies for the last couple of days. I decided to try a different recipe today to see if it will be better than my go to recipe. I'm super glad I did because these cookies are chewier than the cookies that I've baked for Dr. Sweetpea in the past. In fact, I think this recipe will now be my new go to recipe whenever Dr. Sweetpea requests Oatmeal Chocolate Chip Cookies.


Chewy Oatmeal Chocolate Chip Cookies
(Source: Averie Cooks)

1 large egg
1/2 cup unsalted butter (1 stick)
1/2 cup light brown sugar, packed
1/4 cup granulated sugar
1 tablespoon vanilla extract
1 1/2 cups old-fashioned whole rolled oats (not instant or quick cook)
3/4 cup all-purpose flour
1/2 to 1 teaspoon cinnamon, added to taste
1/2 teaspoon baking soda
pinch salt, optional and to taste
1 heaping cup semi-sweet chocolate chips
1/2 cup raisins or nuts, optional and to taste

To the bowl of a stand mixer fitted with the paddle attachment (or large mixing bowl and electric mixer) combine the egg, butter, sugars, vanilla, and beat on medium-high speed until creamed and well combined, about 4 minutes.

Stop, scrape down the sides of the bowl, and add the oats, flour, cinnamon, baking soda, optional salt, and beat on low speed until just combined, about 1 minute.

Stop, scrape down the sides of the bowl, and add the chocolate chips, optional raisins or nuts, and beat on low speed until just combined, about 30 seconds.

Using your hands, form dough balls that are approximately the size of golf balls. Place mounds on a large plate or tray, cover with plastic wrap, and refrigerate for at least 2 hours, up to 5 days. Do not bake with unchilled dough because cookies will bake thinner, flatter, and be more prone to spreading.

Preheat oven to 350F, line a baking sheet with a Silpat or spray with cooking spray. Place dough mounds on baking sheet, spaced at least 2 inches apart (I bake 8 cookies per sheet) and bake for about 8-9 minutes (for super soft cookies, longer for more well-done cookies), or until edges have set and tops are just set, even if slightly undercooked, pale, and glossy in the center; don't -overbake. Cookies firm up as they cool. Allow cookies to cool on baking sheet for about 10 minutes before serving. I let them cool on the baking sheet and don't use a rack.

Cookies will keep airtight at room temperature for up to 1 week or in the freezer for up to 6 months. Alternatively, unbaked cookie dough can be stored in an airtight container in the refrigerator for up to 5 days, or in the freezer for up to 4 months, so consider baking only as many cookies as desired and save the remaining dough to be baked in the future when desired.

Saturday, January 3, 2015

The Very Best Fajitas

I usually try to have a picture with every recipe that I post on my little blog but by the time I wanted to take some pictures, we all all of the fajitas. One of the things I usually order at a Mexican restaurant is Steak Fajitas. I absolutely love the juicy pieces of meat mixed with bell peppers and onions. I have tried many fajita recipes at home to recreate the kind that I have eaten at restaurants but didn't have much luck until I found Emeril's recipe. The meat is perfectly marinated and cooking it on a cast iron skillet is key to making this restaurant quality.

Steak Fajitas
(Source: Emeril)

Marinade:
1 (2 to 3)pound flank steak
1/2 cup dry Sherry wine
1/2 cup soy sauce
2 tablespoons garlic, minced
2 tablespoons brown sugar
1 tablespoon tomato paste
1 teaspoon freshly ground black pepper
1 teaspoon dried oregano (my addition)
1 teaspoon chili powder (my addition)
1 lime, juiced (my addition)

Vegetables:
2-3 red bell peppers, sliced
1 large onion, sliced

Slice the meat in 1/2 inch thick slices.  In a bowl, combine the remaining ingredients. Pour the marinade mixture into the bag with the steak, seal and marinate in the refrigerator at least 6 hours and up to 24 hours in advance.

Pour about a tablespoon of vegetable oil onto a cast iron skillet. Let it get really hot before adding the marinated meat into the skillet. Let the meat get nice and brown on all sides and move the cooked meat to a plate. Toss in the sliced red bell peppers and onion into the cast iron skillet you used to cook the meat. Let the vegetables cook for about 5 minutes before tossing the meat back into the skillet. Warm up some tortillas and serve with some guacamole and sour cream :o)

Saturday, December 27, 2014

Korean Meat Patties

I grew up eating a ton of these meat patties A LOT around the holidays. They can be eaten as appetizers or as a side dish along with the meal. No need to worry about making a special dipping sauce for these gems. Just dip them in soy sauce and chow away :o)


Korean Meat Patties
(Source: My Mom)

Meat patties ingredients
1/2 pound ground beef
1/2 pound ground pork
1 small onion, finely diced
2 tablespoons carrot, finely diced
1 green onion, finely chopped
1 large garlic, finely chopped
12 ounces of firm tofu, squeeze the excess water with your hands
1 egg
Black Pepper
Sesame Seeds
1 tablespoon soy sauce
1 teaspoon salt
2 tablespoons vegetable oil
2 tablespoons sesame oil

Egg wash ingredients
4-5 eggs, whisked in a large bowl
Flour

Mix all of the meat patties ingredients together and form into  1 1/2 inch balls. Squish each ball down with your fingers a little bit so they turn into patties.  Dip all of the meat patties in flour so they have a nice layer of flour on all sides. Then dip them in the whisked egg mixture before cooking them on a hot griddle or skillet. Cook each side of the meat patty for about 2 - 3 minutes. 


Friday, December 26, 2014

Korean Beef Roll

One of my favorite Korean appetizers is the Korean Beef Roll. Basically, it's thinly sliced veggies and/or fruit rolled up in thin slices of Bulgogi meat. Plus, the hot mustard dipping sauce adds an extra pop of flavor that is absolutely addicting. I ask my mom to make these for me allllllll the time. So when I came home for the holidays, I finally got her recipe so I can make it myself.


Korean Beef Rolls
(Source: My mom)

Meat: 
1 1/2 pounds of thinly sliced bulgogi meat (or ribeye steak)
1 inch ginger, peeled and chopped finely
2- 3 cloves garlic, chopped finely
1 green onion, sliced finely
2 – 3 tablespoons onion, chopped finely
1/3 cup soy sauce
2 tablespoons corn syrup
1 tablespoon mirin
1 teaspoon sesame seed
1 tablespoon sesame oil
1 teaspoon black pepper
1 1/2 tablespoons sugar
1/4 of a large Korean pear, grated (optional)
Mochiko powder or Cornstarch to sprinkle on each piece of meat before it's cooked

Veggies/Fruit: 
2 red or orange bell peppers, julienned 
2 pears, julienned
2 cucumbers, julienned

Remove excess fat from the bulgogi meat. Sprinkle sugar in-between the thin slices of meat. Place in a large bowl and let it chill in the refrigerator for 6 hours or overnight. Drain the excess liquid from the bowl and set aside. In another bowl, mix together the ginger, garlic, green onion, onion, soy sauce, corn syrup, mirin, sesame seed, sesame oil, black pepper, and  1 1/2 tablespoons sugar. Lay a piece of meat flat in a bowl and spread a little bit of marinade on top. Then lay another piece of meat on the first piece of meat and spread a little bit of marinade on top. Keep repeating this process of layering meat on top of each other until the last piece. Let it marinate in the  refrigerator overnight. When ready to eat, sprinkle both sides of every piece of meat with Mochiko powder or cornstarch. Lay each piece on a skillet so it is flat. Let it brown on one side, flip, and brown the other side. It is absolutely imperative that each piece of meat is cooked flat as possible or these rolls will be really difficult to make. Place the cooked pieces of meat on a plate. 

Once every piece of meat is cooked on both sides and your veggies/fruit are julienned, you are ready to make these delicious rolls. Grab one piece of meat and place it on a flat surface. Grab a few pieces of julienned bell peppers, pears, and cucumbers and place them on the edge of the meat and roll it up. Slice each meat roll in half to serve as appetizers. Repeat with every piece of meat. Once you are done, serve them with the hot mustard dipping sauce below. 

Dipping Sauce: 
Make the mustard paste first.

Mustard Paste:
1 tablespoon Korean mustard powder (it must be Korean mustard powder or this recipe won't work)
1 tablespoon hot water

Mix together until well combined. Then combine this paste with the other sauce ingredients below.

Mustard Sauce
1 tablespoon Korean mustard paste (use above recipe)
2 tablespoons vinegar
2 tablespoons water
1 tablespoon sugar
1/2 teaspoon soy sauce
1 tablespoon sweetened condensed milk
1 1/2 teaspoons salt

Mix all ingredients together until well combined. Serve with the beef rolls. 


Apple Harvest Bread

This Apple Harvest Bread is a loaded version of pumpkin bread. Why is it loaded? Because it's packed with crisp Granny Smith Apples, raisins, and walnuts. Definitely a quick, easy, and delicous bread to make during the holidays. 


Apple Harvest Bread
(Source: Costco Cookbook)

2 cups flour
1/2 cup packed light brown sugar
1/2 teaspoon salt
1 teaspoon baking soda
1/2 teaspoon baking powder
1 teaspoon ground nutmeg
1 teaspoon ground cinnamon
1/2 teaspoon ground cloves
1 1/2 cups sugar
3/4 cup butter, softened
2 eggs
1 pound pumpkin, cooked and mashed (or 15-ounce can)
1 teaspoon vanilla extract
3-4 Granny Smith apples, peeled and diced (or shredded)
1/2 cup raisins (optional)
1/2 cup walnuts (optional)

TOPPING
2 teaspoons white sugar
2 teaspoons light brown sugar
1 teaspoon ground cinnamon

Preheat oven to 350°F. Grease 3 small loaf pans. Combine flour, brown sugar, salt, baking soda, baking powder and spices in a bowl. In another bowl, cream sugar and butter. Beat in eggs, pumpkin and vanilla. Add the flour mixture, stirring until just moistened. Stir in apples, raisins and walnuts. Spoon the batter into the prepared pans. Bake the loaves for 45-50 minutes, or until a toothpick inserted in the center comes out clean. Meanwhile, place all the topping ingredients in a small bowl and stir to blend. Set aside. When the bread comes out of the oven, sprinkle with the topping. Let sit for 15 minutes, then remove from the pans and let cool on a wire rack. Makes 12 servings.


Tuesday, December 23, 2014

Happy Holidays

Happy Holidays everyone! I flew home for Christmas on Friday and have been baking some more. Instead of creating three separate posts for each cookie, I decided to combine combine them into one post.

Cherry Delights

I've been eating these cookies ever since I was a kid. My mom baked these every year and I remember helping her out by sticking the cherry in the middle of each cookie. These cookies are chewy, slightly sweet, and the cherry adds that extra pop of flavor that make these cookies addicting. 


1 cup butter, softened
1/2 cup sugar
1/2 cup light corn syrup
2 eggs, divided
2 1/2 cups flour
2 cups nuts, finely chopped
Maraschino cherries, halved

Mix butter and sugar until fluffy. Stir in light corn syrup and egg yolks; mix well. Mix in flour. Chill. Roll into 1 inch balls. Dip into slightly beaten egg whites and roll in chopped nuts. Place on greased cookie sheets. Press candied cherry halves into centers. Bake in 325 degree F oven for 20 minutes.

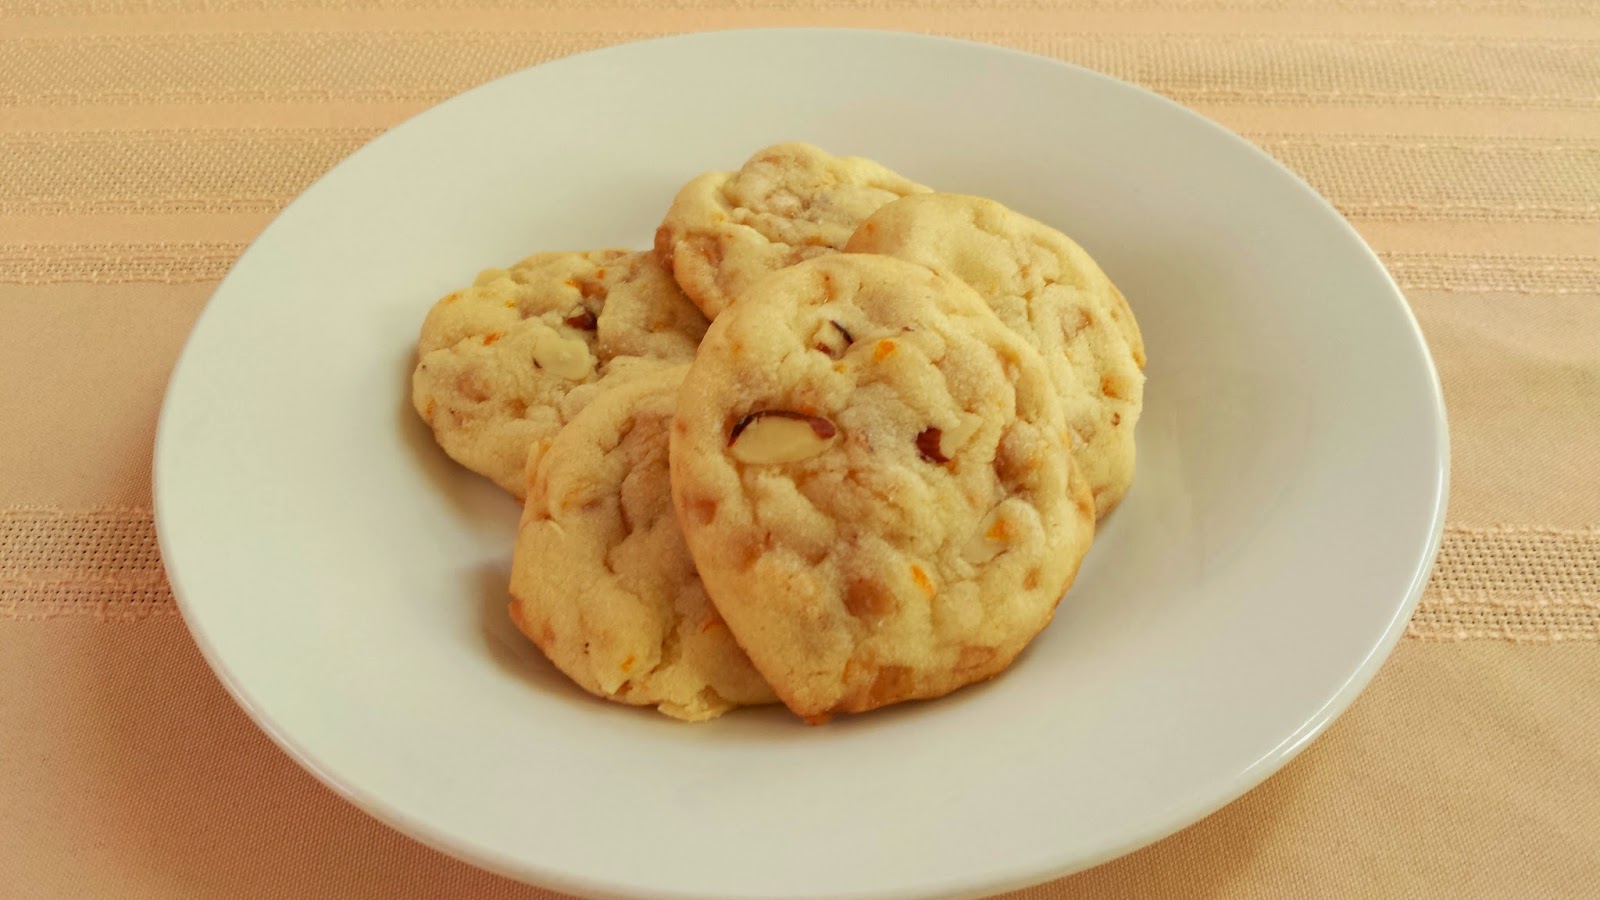
Orange Toffee Almond Sandies
(Source: Paula Deen)

I baked some sandies earlier this year that were absolutely delicious. These sandies are almost identical to those, except these have orange zest in the dough. I absolutely love anything that is flavored with orange around the holidays, so I gave these sandies a try and was not disappointed


1 cup butter, softened
1 cup vegetable oil
1 cup sugar
1 cup confectioners' sugar
1/4 teaspoon almond extract
1/2 teaspoon orange extract
2 eggs
4 1/2 cups all-purpose flour
1 teaspoon baking soda
1 teaspoon cream of tartar
1 teaspoon salt
3 tablespoons orange zest
2 cups sliced almonds
2 cups English toffee bits

Preheat the oven at 350 degrees F. In a mixing bowl, add the butter, oil and the sugars. Using a hand-held mixer, beat until combined. Beat in the extracts. Add the eggs, 1 at a time, beating well after each addition. Combine flour, baking soda, cream of tartar and salt in a separate bowl. Gradually add to the creamed mixture. Stir in orange zest, almonds and toffee bits. Drop by teaspoonfuls, 2-inches apart, onto ungreased baking sheets. Bake until golden brown, about 10 to 12 minutes. Remove from the oven to a wire rack to cool before serving.

Caramel Pecan Sticky Bun Cookies
(Source: Recipe Girl)

I'm addicted to sticky buns, so when I saw the recipe for these sticky bun cookies, I had to bake them for the holiday cookie tray. The dough is very similar to the Cherry Delights, but the center of the cookie is filled with a sticky pecan mixture. Needless to say, I several of these suckers in my mouth as soon as they came out of the oven. I'm sure these will be in my regular cookie rotation for years to come. 


COOKIES:
1 cup butter, at room temperature
1/2 cup granulated white sugar
1/2 cup dark corn syrup
2 large egg yolks
2 1/2 cups all-purpose flour

FILLING:
1/2 cup powdered sugar
1/4 cup butter
3 Tablespoons dark corn syrup
1/2 cup pecans, toasted and chopped
1 large egg white, slightly beaten

In large bowl, beat 1 cup butter and sugar until light and fluffy. Add 1/2 cup corn syrup and egg yolks; blend well. Stir in flour; mix well. Cover with plastic wrap- refrigerate 1 hour for easier handling. In small saucepan, combine powdered sugar, 1/4 cup butter, and 3 Tablespoons corn syrup; bring to a boil. Remove from heat. Stir in pecans. Refrigerate at least 10 minutes. Preheat oven to 375 degrees F. Lightly grease cookie sheets or line w/ parchment or silpat mats. Shape dough into 1 1/2-inch balls. Place 2 inches apart on greased cookie sheets. Bake for 5 minutes. Remove from oven. Brush tops of partially baked cookies lightly with egg white. With small spoon, carefully scoop about 3/4 tsp. of the filling in the center of each cookie; pressing down slightly. Return to the oven and bake an additional 6-9 minutes, or until light golden brown. Cool for 2 minutes and then remove from cookie sheets. Cool completely.


Thursday, December 18, 2014

Chocolate Covered Cherry Cookies

Dr. Sweetpea is a Chocolate Covered Cherry fanatic. He is the type that could down an entire box of Cordial Cherries in one sitting, not joking. So when I saw this Chocolate Covered Cherry cookie recipe in my America's Test Kitchen Holiday Cookbook, I knew that he would love these. I was definitely right because he devoured 4 cookies as soon as they came out of the oven. These cherry cookies never stood a chance! The chewy chocolate cookie, with the juicy cherry, and chocolate topping is over the top delicious. Definitely make these for your holiday cookie tray this year. 


Chocolate Covered Cherry Cookies
(Source: America's Test Kitchen)

1 1/4 cups all purpose flour
1/2 cup unsweetened cocoa powder
1/4 teaspoon baking soda
1/4 teaspoon baking powder
1/4 teaspoon salt
1/2 cup unsalted butter, softened
1 cup sugar
1 egg
1 1/2 teaspoons vanilla
30 maraschino cherries
1 cup semisweet chocolate chips
1/2 cup sweetened condensed milk

Preheat oven to 350 F. Mix the flour, cocoa, baking soda, baking powder & salt together, set aside. In a mixer beat the butter until softened. Add the sugar and cream the mixture until like & fluffy. Beat in the egg and vanilla. Add the flour mixture & beat until well mixed. Roll the dough into 1-inch balls & place them 2 inches apart on an ungreased cookie sheets. Use your thumb to make an indentation in the center of each cookie.

Drain the cherries reserving the juice. Remove the stems and place a cherry into the indentation in each cookie. Put the chocolate chips & condensed milk in a small saucepan. Stir over low heat until the chocolate is melted. Stir in 4 teaspoons of the cherry juice. Spoon 1/2 – 1 teaspoon of chocolate over the top of each cherry covering it completely. If the chocolate is too thick add a little more cherry juice. Bake for 6-7 minutes & cool on a rack.

Sunday, December 14, 2014

Chicken with Mustard Mascarpone Marsala Sauce

If you ask Dr. Sweetpea what his favorite Italian dish is, it would be Chicken Marsala. He absolutely loves the flavorful Marsala sauce and the tender pieces of chicken. I searched high and low for a great Chicken Marsala recipe that I can make at home and get rave reviews from Dr. Sweetpea. I collected about ten different recipes and finally settled on Giada's Chicken with Mustard Mascarpone Marsala Sauce. It's almost identical to your typical Chicken Marsala but the Mascarpone makes it creamy and the Dijon mustard adds a little bit of a bite. Needless to say Dr. Sweetpea LOVED his meal and wants me to make this for him regularly.


Chicken with Mustard Mascarpone Marsala Sauce 
(Source: Giada De Laurentiis)

1 1/2 pounds boneless skinless chicken breasts, each breast cut crosswise into 3 pieces
Salt and freshly ground black pepper
2 tablespoons olive oil
5 tablespoons butter, divided
3/4 cup sliced onion
1 pound cremini mushrooms, sliced
2 tablespoons minced garlic
1 cup dry Marsala wine
1 cup (8 ounces) mascarpone cheese
2 tablespoons Dijon mustard
2 tablespoons chopped fresh Italian parsley leaves, plus whole sprigs, for garnish
12 ounces dried fettuccine (I served mine with Risotto)

Sprinkle the chicken with salt and pepper. Heat the oil in a heavy large skillet over high heat. Add the chicken and cook just until brown, about 4 minutes per side. Transfer the chicken to a plate and cool slightly.

While the chicken cools, melt 2 tablespoons of butter to the same skillet over medium-high heat, then add the onion and saute until tender, about 2 minutes. Add the mushrooms and garlic and saute until the mushrooms are tender and the juices evaporate, about 12 minutes. Add the wine and simmer until it is reduced by half, about 4 minutes. Stir in the mascarpone and mustard. Cut the chicken breasts crosswise into 1/3-inch-thick slices. Return the chicken and any accumulated juices to the skillet. Simmer, uncovered, over medium-low heat until the chicken is just cooked through and the sauce thickens slightly, about 2 minutes. Stir in the chopped parsley. Season the sauce, to taste, with salt and pepper.

Meanwhile, bring a large pot of salted water to a boil. Add the fettuccine and cook until al dente, stirring occasionally, about 8 minutes. Drain. Toss the fettuccine with 3 tablespoons of butter and season, to taste, with salt and pepper. Swirl the fettuccine onto serving plates. Spoon the chicken mixture over top. Garnish with parsley sprigs and serve.


Saturday, December 13, 2014

Nutella Hazelnut Crinkle Cookies

Who doesn't love Nutella?! My love for this delicious spread goes way back to my childhood days when it was spread on a slice of toast and topped off with fresh strawberry slices. I've also had it on a crepe with sliced bananas, strawberries, and powdered sugar. Then when I left home to attend college, I bought a huge jar of Nutella and ate it with almost everything during finals week. So it's obviously not surprising that I made these Nutella Crinkle Cookies when I saw it in one of my cookie magazines. Making these cookies was very time consuming but definitely worth it because they are super chocolately/hazelnutty and perfectly chewy. Definitely try making these cookies this year for our cookie tray :o)


Nutella Hazelnut Crinkle Cookies
(Source: America's Test Kitchen)

3 cups all-purpose flour
2 teaspoons baking powder
1/2 teaspoon salt
1 1/4 cups Nutella
4 tablespoons unsalted butter, at room temperature
1 1/3 cups granulated sugar
2 eggs, at room temperature
1 teaspoon vanilla extract
1 teaspoon instant espresso powder
1/3 cup milk
2 cups hazelnuts, toasted, skinned and finely chopped
1 cup powdered sugar

Combine the flour, baking powder, and salt in a medium bowl; set aside. With an electric mixer on medium-high speed, beat the Nutella, butter, and granulated sugar until light and fluffy, about 2 minutes. Add the eggs, vanilla, and espresso powder and mix until incorporated. Reduce the speed to low and alternate additions of flour mixture and milk, starting and ending with the flour, and mixing until just combined after each addition. Fold in 1/2 cup of the hazelnuts. Refrigerate the dough until firm, at least 2 hours and up to 24 hours.

Preheat oven to 375 degrees F. Line baking sheets with parchment paper. Place the remaining hazelnuts and the powdered sugar in two separate bowls. Using a medium cookie scoop (or about 2 tablespoonfuls), roll the dough into balls, roll in the hazelnuts, then roll in the powdered sugar. Place the balls 2 inches apart on the baking sheets. Bake until the edges are set and the middle still looks a tad soft, about 10 minutes. Cool for 5 minutes on the baking sheet, and then transfer to a wire rack to cool completely. Store cookies in an airtight container at room temperature.


Thursday, December 11, 2014

Christmas Crack Cookies

My favorite season is here!!! My favorite season is here!!! What season is that?! It's Christmas Cookie baking season :o) 

I absolutely loooove dusting off my favorite cookie cookbooks to find new and interesting recipes to try each year. As much as I love trying new recipes, I also love making tried and true recipes every year too. I grew up eating these toffee bars made with saltines. These are super quick to make and very addicting...which is why I made these first to start off the holiday baking season.


Christmas Crack Saltines
(Source: Tampa Bay Times)

40 saltine crackers
1 cup (2 sticks) unsalted butter
1 cup brown sugar
1 (12-ounce) package chocolate chips
Chopped nuts

Preheat oven to 400 degrees. Cover cookie sheet with foil and coat lightly with a non-stick spray. Place saltine crackers in single layer on foil. On stove, melt butter and brown sugar. Bring to full boil and cook 3 minutes, stirring constantly. Remove and pour over crackers. Bake for 5 minutes (the brown sugar mixture will be very bubbly. It very important that this is baked for the entire 5 minutes or it won't harden properly). Sprinkle chocolate chips on top. Leave until melted, about 3 minutes. Spread out the chocolate and sprinkle with nuts. Refrigerate for at least 4 hours. Break into pieces. Store in airtight container in refrigerator. This will make up to 40 or more pieces, depending on how small or big you break them.