Tuesday, February 26, 2019

Hungarian Goulash

I rarely post a recipe while I'm eating the actual dish that I made. This Hungarian Goulash is an exception. It takes a long time for the meal to cook but it's so SOOOO worth it because it tastes so dang delicious!!! In fact, Dr. Sweetpea just walked past and asked me to make this again this week because it's that good. Definitely a keeper recipe in our household!

Hungarian Beef Goulash
(Source: Chef John)

2 1/2 pounds boneless beef chuck, cut into 2-inch cubes, seasoned generously with salt and pepper
2 onions, chopped
2 teaspoons olive oil
1/2 teaspoon salt
2 teaspoons caraway seeds, toasted and ground (I omitted because we don’t like caraway)
2 tablespoons paprika
1 tablespoon Hungarian Hot paprika (my addition)
1 teaspoon freshly ground black pepper
1/2 teaspoon cayenne
1 teaspoon dried marjoram leaves
1/2 teaspoon dried thyme leaves
4 cups chicken broth
1/4 cup tomato paste
3 garlic cloves, crushed
1/2 tsp salt, or to taste
1 bay leaf
1 teaspoon sugar
2 tablespoons balsamic vinegar

Season beef with salt and black pepper. Heat vegetable oil in a large skillet over high heat; cook and stir beef in hot oil in batches until browned on all sides, about 5 minutes per batch. Transfer to a large stockpot and reserve drippings in the skillet. Return skillet to medium heat; stir onions into the reserved drippings, drizzle olive oil over onions, season with 1/2 teaspoon salt and cook until onion has softened, about 5 minutes. Transfer to the stockpot with beef. Combine paprika, caraway seeds, black pepper, marjoram, thyme, and cayenne pepper in the skillet and toast over medium heat until fragrant, about 3 minutes. Add 1 cup chicken broth and stir; transfer to the beef and onion mixture. Stir 3 cups chicken broth into beef mixture. Add tomato paste, garlic, vinegar, sugar, 1/2 teaspoon salt, and bay leaf; place stockpot over high heat and bring to a boil. Reduce heat to low and simmer until a fork inserts easily into the meat, 1 1/2 to 2 hours.

Wednesday, February 20, 2019

Chicken Vesuvio

Dr. Sweetpea is a HUGE fan of Chicken Vesuvio. It's one of the dishes that he will regularly order when we're home in Chicago and eating at our favorite Italian restaurants. Most people outside Chicago have never heard of Chicken Vesuvio because it's rarely found on menus outside of the Chicago metropolitan area. Anyway, when Dr. Sweetpea said he is craving this dish, I went online to find several recipes and tweaked Giada's recipe to our liking. Needless to say, I was told that this was one of the best meals that he's had. Definitely a keeper in our household!


Chicken Vesuvio
(Source: Giada De Laurentiis) 

3 tablespoons olive oil
4 chicken thighs with skin and bones
Salt and freshly ground black pepper
1 1/2 pounds small red-skinned potatoes, halved
4 large garlic cloves, minced
3/4 cup dry white wine
3/4 cup chicken broth
1 1/2 teaspoons dried oregano
1 teaspoon dried thyme
8 ounces frozen artichoke hearts (I used 8 ounces of sliced mushrooms)
1 cup frozen sweet peas (my addition)
1/4 lemon juice (my addition)
2 tablespoons unsalted butter

Preheat the oven to 450 degrees F. Heat the oil in large ovenproof pot over high heat. Sprinkle the chicken with salt and pepper. Working in 2 batches if necessary, cook the chicken in the pot until golden brown on all sides, about 10 minutes. Transfer the chicken to a bowl. Carefully add the potatoes and mushroom to the same pot and cook until they are golden brown, stirring occasionally, about 10 minutes. Add the garlic and saute for 1 minute. Add the wine and stir to scrape up any brown bits on the bottom of the pot. Add the broth, lemon juice, oregano, and thyme. Return the chicken to the pot. Add in sweet peas and stir to combine. Bring to a boil over medium-high heat. Cover and bake in the oven until the chicken is cooked through, about 20 minutes. Transfer the chicken to a platter. Arrange the potatoes around chicken. Turn heat to low and place pot with sauce back on stovetop. Stir in the butter. Pour the sauce over chicken and potatoes, and serve.

Wednesday, February 13, 2019

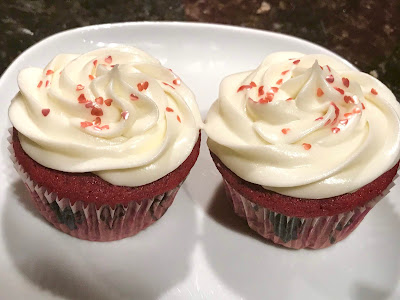
Red Velvet Cupcakes

Valentines Day is tomorrow, so I decided to make Red Velvet Cupcakes to share with everyone! These are my favorite cupcakes to make for Valentines Day and by far the best red velvet cupcake recipe that I've tried. These are definitely a keeper for us!


Red Velvet Cupcakes with Cream Cheese Frosting
(Source: America's Test Kitchen)

1 1/8 cups (5 2/3 ounces) all-purpose flour
3/4 teaspoon baking soda
Pinch salt
1/2 cup buttermilk, room temperature
1 large egg
1 1/2 teaspoons distilled white vinegar (I used apple cider vinegar)
1 teaspoon vanilla extract
1 tablespoon natural unsweetened cocoa powder
1 tablespoon red food coloring
6 tablespoons unsalted butter, softened
3/4 cup (5 1/4 ounces) sugar

Adjust oven rack to middle position and heat oven to 350 degrees. Line 12-cup muffin tin with paper or foil liners. 

Whisk flour, baking soda, and salt together in bowl. Whisk buttermilk, egg, vinegar, and vanilla together in second bowl. Mix cocoa and food coloring into smooth paste in small bowl. 

Using stand mixer fitted with paddle, beat butter and sugar on medium-high speed until pale and fluffy, about 3 minutes. Reduce speed to low and add flour mixture in 3 additions, alternating with buttermilk mixture in 2 additions, scraping down bowl as needed. Beat in cocoa mixture until batter is uniform. Give batter final stir by hand. 

Divide batter evenly among prepared muffin cups. Bake until toothpick inserted in center comes out with few crumbs attached, 15 - 20 minutes, rotating muffin tin halfway through baking. 

Let cupcakes cool in muffin tin on wire rack for 10 minutes. Remove cupcakes from muffin tin and let cool completely on rack, about 1 hour. Spread or pipe frosting evenly on cupcakes. Serve. 

Cream Cheese Frosting
(Source: Food Network Magazine)

12 ounces cream cheese, at room temperature
2 sticks (16 tablespoons) unsalted butter, at room temperature
4 cups confectioners sugar
1/2 teaspoon salt
1 1/2 teaspoons pure vanilla extract

Beat the cream cheese and butter in a large bowl with a mixer  on a medium-high speed until creamy, about 2 minutes. Reduce the mixer speed to low; beat in half the confectioners sugar until combined. Beat in the remaining confectioners sugar, the salt and vanilla. Increase the speed to medium high and beat until smooth and fluffy, about 3 minutes. 

**Note: I halve the cream cheese frosting recipe for my cupcakes since the whole recipe would be too much. 

Monday, February 11, 2019

Smothered Chicken

This is another fantastic meal to make during the week when you just don't want to be spending a lot of time in the kitchen. I came across this recipe a few years ago in Southern Living it was just fabulous. Actually, the sauce was so good that Dr. Sweetpea didn't even know that one of the ingredients is condensed cream of mushroom soup. Both of us devoured our meal and this will definitely be a recipe that I make regularly when I want a quick and easy dinner for the both of us.


Snappy Smothered Chicken
(Source: Southern Living)

1 (8-oz.) package wide egg noodles
1 teaspoon paprika
1 teaspoon dried thyme leaves, crumbled
1/2 teaspoon salt
1/4 teaspoon pepper
3 tablespoons butter
1 large onion, chopped
1 (16-oz.) package mushrooms, sliced
1 teaspoons jarred minced garlic
1 (10 3/4-oz.) can cream of mushroom soup
1 cup milk
1/3 cup dry white wine
1 rotisserie chicken, cut into serving pieces
2 tablespoons chopped fresh parsley

Prepare noodles according to package directions. Keep warm. Meanwhile, stir together paprika, dried thyme, salt, and pepper in a small bowl. Melt butter in a large skillet over medium-high heat; add onion and mushrooms, and sauté 8 to 10 minutes or until onion is tender. Stir in garlic and paprika mixture; sauté 2 minutes. Add soup, milk, and, if desired, wine, and bring to a boil, stirring frequently. Add chicken pieces; spoon sauce over top of chicken. Reduce heat to low, and cook, covered, 10 to 15 minutes or until chicken is thoroughly heated. Stir in 1 Tbsp. parsley. Serve over hot cooked noodles. Sprinkle with remaining parsley.


Saturday, February 9, 2019

Cinnamon Raisin Oatmeal Scones

Dr. Sweetpea and I absolutely love scones, especially if they are light, tender, and not dry. Additionally, we love oatmeal and go through a large container of it on a weekly basis. I wanted to make scones that have oatmeal as ingredient but wouldn't be dense either. After looking at several recipes online, I decided to make the recipe from Cooks Illustrated because their recipes have never failed me. The oatmeal scones were SUPER easy to make on a Saturday morning and they were absolutely delicious. These Cinnamon Raisin Oatmeal Scones hit the spot and will be made regularly in our household! 


Cinnamon Raisin Oatmeal Scones
(Source: Cooks Illustrated)

1 1/2      cups rolled oats (4 1/2 ounces) or quick oats
1/4         cup whole milk
1/4         cup heavy cream
1            large egg
1 1/2      cups unbleached all-purpose flour (7 1/2 ounces)
1/4         teaspoon ground cinnamon
1/3         cup granulated sugar (2 1/4 ounces)
2            teaspoons baking powder
1/2         teaspoon table salt
10          tablespoons unsalted butter, cold, cut into 1/2-inch cubes
1/2         cup raisins
1            tablespoon granulated sugar for sprinkling

Adjust oven rack to middle position; heat oven to 375 degrees. Spread oats evenly on baking sheet and toast in oven until fragrant and lightly browned, 7 to 9 minutes; cool on wire rack. Increase oven temperature to 450 degrees. Line second baking sheet with parchment paper. When oats are cooled, measure out 2 tablespoons and set aside.

Whisk milk, cream, and egg in large measuring cup until incorporated; remove 1 tablespoon to small bowl and reserve for glazing.

Pulse flour, cinnamon, 1/3 cup sugar, baking powder, and salt in food processor until combined, about four 1-second pulses. Scatter cold butter evenly over dry ingredients and pulse until mixture resembles coarse cornmeal, twelve to fourteen 1-second pulses. Transfer mixture to medium bowl; stir in cooled oats and raisins. Using rubber spatula, fold in liquid ingredients until large clumps form. Mix dough by hand in bowl until dough forms cohesive mass.

Dust work surface with half of reserved oats, turn dough out onto work surface, and dust top with remaining oats. Gently pat into 7-inch circle about 1 inch thick. Using bench scraper or chef’s knife, cut dough into 8 wedges and set on parchment-lined baking sheet, spacing them about 2 inches apart. Brush surfaces with reserved egg mixture and sprinkle with 1 tablespoon sugar. Bake until golden brown, 12 to 14 minutes; cool scones on baking sheet on wire rack 5 minutes, then remove scones to cooling rack and cool to room temperature, about 30 minutes. Serve.

Thursday, February 7, 2019

Homemade Vanilla Bean Salted Caramels

Dr. Sweetpea and I absolutely love gourmet caramels, but they are also super pricey! I decided to try my hand at making caramels for us at home and they were a MASSIVE hit. It's definitely time consuming to make, so I finally understand why gourmet caramels are so expensive. These caramels turned out SO GOOD that I will definitely be making regularly!


Homemade Vanilla Bean Salted Caramels
(Source: Cookies and Cups)

2 cups granulated sugar
1 cup light brown sugar
2 cups half and half (I used evaporated milk)
1 cup light corn syrup
1 cup (2 sticks) Salted Butter, cubed (I used unsalted butter)
1 tablespoon vanilla extract
1 tablespoon of flaked sea salt (or more depending on your preference)
1 vanilla bean (my addition)

Line a 9×9 baking pan with foil and coat with nonstick spray, or butter. Set aside.
In a medium heavy saucepan combine the granulated sugar, brown sugar, half and half (or evaporated milk), corn syrup, and butter over medium-low heat (I also added the seeds of one vanilla bean and the scraped pods into this mixture). Cook and stir constantly until the mixture reaches 250°F on a candy thermometer. The mixture will bubble up and get thick as it cooks, while turning an amber color. The process will take over an hour, so be prepared to stir! When the mixture started to get thick, I removed the vanilla bean pods and kept stirring.  Once it reaches 250°F remove the pan from the heat and stir in the vanilla extract. Pour the mixture into the prepared pan. Wait 30 minutes and sprinkle with sea salt.
Cover the pan with foil and place in refrigerator until set. Remove the candy from the pan with the foil. Gently peel the foil from the sides and bottom of the caramel. Allow the candy to come to almost room temperature before cutting into pieces. Wrap each candy with a small piece of wax paper.


Tuesday, February 5, 2019

Sassy Chicken

Who doesn't love an easy weeknight meal? Especially since I'm working full-time and don't want to cook a meal that's going to take a long time to make after work. That's when grilled chicken recipes are my go-to when it's warm enough to grill outside. This Sassy Chicken marinade is the newest one that I tried and it turned out fabulous. I marinated the chicken overnight and grilled it as soon as I got home in the evening. The chicken was super flavorful and perfect when served with some pita and a delicious salad on the side. As soon as Dr. Sweetpea walked through the front door, his first question was, "What smells so good?". We both devoured our meal and this will definitely be in our regular meal rotation. No pictures this time because we ate the chicken quickly because we were starving!

Sassy Chicken
(Source: Tupelo Honey Cafe)

1/3 cup peeled garlic cloves
1/2 cup extra-virgin olive oil
3 tablespoons sweet paprika
1 1/2 tablespoons lemon pepper (I use the no-salt added Mrs. Dash brand)
6 (4- to 6-ounce) boneless, skinless chicken thighs

Heat the grill to medium-high heat. Place the garlic in a food processor, cover, and process until finely minced. Add the olive oil, paprika, and lemon pepper and process until smooth. Place the chicken thighs in a large bowl and pour the olive oil mixture over them, turning the thighs to coat well with the sauce. Marinate at room temperature for 30 minutes.

Drain the chicken thighs, discarding the marinade. Place the chicken on the grill rack, cover with the grill lid, and cook until the meat is no longer pink, 4 to 5 minutes per side.

Saturday, February 2, 2019

French Onion Soup

It's been chilly for the last few days in Houston and since we had some on onions laying around, I decided to make French Onion Soup for us for our dinner. It's simple and perfect on a chilly night. The one downside to making this soup at home is that it stinks up your kitchen with a very pungent smell of onion cooking. Don't get me wrong, I love the smell of a SMALL amount of onion cooking, but definitely not 3 pounds of onions. I sucked it up though and in the end we had a delicious soup that both of us devoured. Dr. Sweetpea loved this soup and it's a keeper in our household!


French Onion Soup
(Source: Epicurious)

5 tablespoons unsalted butter, divided
1 tablespoon vegetable oil
3 pounds Vidalia onions (about 4 medium), halved lengthwise, peeled, and thinly sliced
1 teaspoon kosher salt
1/2 teaspoon freshly ground black pepper
1/2 teaspoon granulated sugar
1 1/2 cups dry white wine
6 cups homemade beef broth or store-bought low-sodium beef broth
10 sprigs thyme
2 bay leaves
1 baguette
1 garlic clove, cut in half lengthwise
2 teaspoons sherry, preferably Fino or Manzanilla (I omitted)
4 ounces Gruyère cheese, grated (about 1 cup)

In a large Dutch oven or other large pot, melt 3 tablespoons butter over medium heat. Add the oil and onions; cook onions are until softened, stirring occasionally, about 15 minutes. Add the salt, pepper, and sugar; continue to cook, stirring occasionally, until onions are deep golden brown and caramelized, reducing heat slightly if onions seem to be browning too quickly, 35 to 45 minutes more.

Add wine and raise heat to high. Cook until almost all liquid has evaporated, 8 to 10 minutes.
Tie thyme and bay leaves into a bundle with twine. Add broth and herb bundle to pot with onions. Bring to a boil, reduce to a simmer, and cook, uncovered, until broth is thickened and flavorful, 20 to 30 minutes. Remove from heat and whisk in remaining 2 tablespoons butter. Taste and adjust seasoning.

Heat the broiler. Cut two 1/2-inch baguette slices for every serving of soup. Place baguette slices on a rimmed baking sheet and toast in oven until crisp and dry but not browned, about 1 minute per side. Rub one side of each toast with the garlic clove and set aside.

Place ramekins or ovensafe bowls on a rimmed baking sheet, add 1/2 teaspoon of sherry to the bottom of each, and ladle soup on top. Top each serving of soup with two garlic-rubbed toasts. Divide cheese among the servings, covering the bread and some of the soup. Carefully transfer baking sheet to oven and broil until cheese is melted and bubbling, 4 to 8 minutes. (Alternatively, if using regular soup bowls: Top each garlic-rubbed toast with some cheese and return to broiler to melt, about 2 minutes more. Divide sherry and soup among bowls, sprinkle with remaining cheese, and top each serving with two cheese toasts.)