Saturday, December 28, 2013

Chocoflan

I have a bit of an obsession with flan. Whenever I go to a Mexican restaurant, I always try their flan for dessert but I've never tried to make it at home by myself. I always thought it would be very time consuming and if I tried to make it at home, it would be a flan fail. So imagine my surprise when I learned about a cake that is half flan and half chocolate cake (drool) and is very simple to make. I turned to google to look up some Chocoflan recipes and decided to try the one by Marcela Valladolid, the queen of mexican cooking on Food Network. Her recipe is so simple to follow and the end result is FABULOUS!!!


Chocoflan
(Source: Marcela Valladolid)

12-cup capacity Bundt pan
Softened butter, to coat pan
1/4 cup cajeta or caramel sauce

For the cake:
10 tablespoons butter, room temperature
1 cup sugar
1 egg, room temperature
1 3/4 cups all-purpose flour
3/4 teaspoon baking powder
3/4 teaspoon baking soda
1/3 cup cocoa powder
1 1/4 cups buttermilk

For the flan:
1 (12-ounce) can evaporated milk
1 (14-ounce) can sweetened condensed milk
4 ounces cream cheese, room temperature
3 eggs
1 tablespoon vanilla extract

For garnish:
1/4 cup cajeta or caramel sauce
1/4 cup chopped pecans

Put an oven rack in the middle of the oven and preheat to 350 degrees F. Coat a Bundt pan with a little butter, then coat the bottom with 1/4 cup cajeta and put it in a large roasting pan. (The roasting pan will serve as a water bath during baking.)

For the cake: Add the butter and sugar to a bowl and using an electric hand mixer or stand mixer, beat until light and fluffy, then beat in the egg. Sift together the flour, baking powder, baking soda and cocoa in a medium bowl. Beat 1/3 of the flour mixture, and 1/2 of the buttermilk into the egg mixture. Repeat, ending with the flour mixture. Blend until well incorporated.

For the flan: In a blender, combine the evaporated milk, condensed milk, cream cheese, eggs and vanilla. Blend on high for 30 seconds.

Scoop the cake batter into the prepared Bundt pan and spreading evenly. Slowly pour the flan mixture over the cake batter. Cover with foil and add about 1-inch of hot water to the roasting pan. Carefully slide the pan into the oven, and bake 1 hour, until the surface of the cake is firm to the touch, or an inserted toothpick comes out clean. When cake is done, remove from the water bath and cool completely to room temperature, about 1 hour. Invert a large, rimmed serving platter over the Bundt pan, grasp tightly together, giggle a little and flip over. Remove the pan and scrape any remaining cajeta from the pan onto the cake, garnish with chopped pecans and serve!

Cook's Notes: The batters may appear to mix when you pour them into the pan, but they completely separate while baking, with the flan ending up on the bottom when it's inverted. You can it warm, but traditionally, it is chilled 24 hours before serving.

Thursday, November 28, 2013

Honey-Kissed Acorn Squash

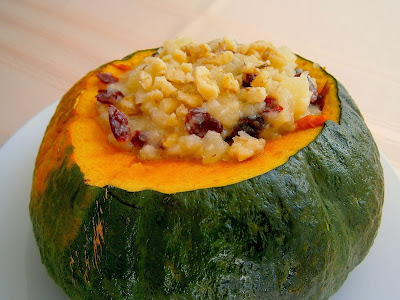
Happy Thanksgiving! Super quick recipe to share today that is PERFECT to add to your Thanksgiving menu. I found the Honey-Kissed Acorn Squash recipe earlier this Fall, and made this about 12 times already. The squash is super tender and the filling isn't too sweet and complements the squash perfectly.


Honey-Kissed Acorn Squash
(Source: Gooseberry Patch Recipe Book)

2 acorn squash, halved lengthwise and seeded (I used a whole Kabocha squash)*
8 oz can crushed pineapple, drained (I used a 16 oz can)
1/4 cup chopped pecans
1/4 cup sweetened dried cranberries
1/4 cup plus 2 tablespoons honey
1/4 cup butter, melted
Optional: ground nutmeg

Place squash halves, cut-side up, in a microwave-safe dish; microwave on high for 8 to 10 minutes until tender. Combine pineapple and next 4 ingredients, spoon into squash halves. Microwave on high 30 to 45 seconds or until thoroughly heated and lightly glazed.** Sprinkle with nutmeg, if desired. 

Note: 
* I usually keep mine whole until I'm about to serve it to people. 
** Instead of microwaving on high for 30 to 45 seconds, I baked mine in the oven at 350 degrees for 15-20 minutes. 


Sunday, November 17, 2013

Almond and Raspberry Blossoms

I know it's not even Thanksgiving yet, but I decided to try out a few cookie recipes before the Christmas Cookie season is in full swing. I tried the Almond and Raspberry Blossoms recipe first because I absolutely love the Almond/Raspberry combination. Admittedly, these cookies are probably a little more time consuming than baking drop cookies, but definitely worth the time after taking a bite of these morsels.

Almond and Raspberry Blossoms
(Source: Better Home and Gardens)


1  cup all purpose flour
1/2 cup ground slivered almonds
1/4 cup granulated sugar
1/2 cup butter
1 egg yolk, lightly beaten
1 (3 oz) package cream cheese, softened
1/4 cup butter, softened
2 tablespoons sugar
1 egg
1/4 teaspoon finely shredded orange peel
1 tablespoon orange juice
Nonstick cooking spray
1/4 cup seedless red raspberry preserves
Powdered sugar
24 raspberries (optional)

In a medium bowl stir together flour, 1/4 cup of the ground almonds, and the 1/4 cup granulated sugar. Using a pastry blender, cut in the 1/2 cup butter until pieces are pea size. In a small bowl combine egg yolk and 1 teaspoon water. Gradually stir yolk mixture into flour mixture, adding 1 to 2 teaspoons additional water, if necessary, to make dough cling together. Gently knead dough just until a ball forms. Wrap dough in plastic wrap; chill for 30 - 60 minutes or until easy to handle. 

Meanwhile, for filling, in a small mixing bowl beat cream cheese, the 1/4  cup softened butter, and the 2 tablespoons granulated sugar with an electric mixer on medium speed until light and fluffy. Add egg, orange peel, and orange juice. Beat until combined, scraping sides of bowl occasionally. Stir in the remaining 1/4 cup ground almonds. 

Preheat oven to 325 degrees Fahrenheit. Coat twenty-four 1 3/4 inch muffin  cups with cooking spray. Divide dough into 24 portions; shape each portion into a ball. Press balls onto the bottoms and up the sides of the prepared muffin cups. 

Spoon 1/2 teaspoon of the preserves into each pastry-lined muffin cup. Spoon filling over preserves. Bake about 25 minutes or until filling is set. Cool in muffin cups on a wire rack for 5 minutes. Remove cookies from muffin cups; cool on wire rack. 

Before serving, sprinkle cookies lightly with powdered sugar. If desired, top each cookie with a raspberry. 


Friday, October 25, 2013

Weeknight Bolognese Sauce

The perfect Bolognese Sauce to make during the week! It's simple to make and hearty enough to eat on a cold autumn evening.


Weeknight Bolognese Sauce 
(Source: Ina Garden)

2 tablespoons good olive oil, plus extra to cook the pasta
1 pound lean ground sirloin
4 teaspoons minced garlic (4 cloves)
1 tablespoon dried oregano
1/4 teaspoon crushed red pepper flakes
1 1/4 cups dry red wine, divided
1 (28-ounce) can crushed tomatoes, preferably San Marzano
2 tablespoons tomato paste
Kosher salt and freshly ground black pepper
3/4 pound dried pasta, such as orecchiette or small shells
1/4 teaspoon ground nutmeg
1/4 cup chopped fresh basil leaves, lightly packed
1/4 cup heavy cream
1/2 cup freshly grated Parmesan cheese, plus extra for serving

Heat 2 tablespoons of olive oil in a large (12-inch) skillet over medium-high heat. Add the ground sirloin and cook, crumbling the meat with a wooden spoon, for 5 to 7 minutes, until the meat has lost its pink color and has started to brown. Stir in the garlic, oregano, and red pepper flakes and cook for 1 more minute. Pour 1 cup of the wine into the skillet and stir to scrape up any browned bits. Add the tomatoes, tomato paste, 1 tablespoon salt, and 1 1/2 teaspoons pepper, stirring until combined. Bring to a boil, lower the heat, and simmer for 10 minutes. Meanwhile, bring a large pot of water to a boil, add a tablespoon of salt, a splash of oil, and the pasta, and cook according to the directions on the box. While the pasta cooks, finish the sauce. Add the nutmeg, basil, cream, and the remaining 1/4 cup wine to the sauce and simmer for 8 to 10 minutes, stirring occasionally until thickened. When the pasta is cooked, drain and pour into a large serving bowl. Add the sauce and 1/2 cup Parmesan and toss well. Serve hot with Parmesan on the side.

Sunday, October 20, 2013

Homemade Pretzel Buns

I felt a little adventurous today and decided to try baking Pretzel Buns for the first time. I always thought they would be extremely difficult to bake, but was pleasantly surprised because the dough is very similar to other bread recipes. The only difference is you drop these buns in a pot of hot water and baking soda prior to baking in the oven. So why on earth would you do that? Because that's how these Pretzel Buns get the signature tangy/malty flavor on the crust.  Personally, I thought these buns were great right out of the oven and AMAZING after they cooled down for about 30 minutes. I'm definitely looking forward to using these to make sandwiches this week!


Pretzel Buns
(Source: Better Home and Gardens)

3/4 cup milk (not fat-free milk)
1/4 cup water
1 1/2 tablespoons sugar
1 package active dry yeast
2 1/3 - 2 1/2 cups all purpose flour
2 tablespoons butter, softened
1 1/4 teaspoons fine sea salt
3 cups hot water
1/2 cup baking soda
1 egg yolk, lightly beaten
1 tablespoon water
Coarse Salt (Optional)

In a small saucepan, heat and stir milk, the 1/4 cup water, and the sugar over low heat until warm (110-115 degrees). Pour into the large bowl of a freestanding electric mixer. Sprinkle with yeast; let stand about 5 minutes or until foamy. Add 2 1/3 cups of the flour, the butter, and the 1 1/4 teaspoons salt. Using the hook attachment, beat on low speed for 2 to 3 minutes or until combined, scraping sides of bowl occasionally. Beat on medium-low speed for 8 to 10 minutes or until a soft dough forms. (The dough should pull away from sides of bowl but still be slightly sticky. If it is too sticky, beat in the additional flour.) 

Turn dough out onto a clean, dry work surface. Knead a few times, then shape dough into a ball. Place in a lightly greased bowl, turning once to grease surface of dough. Cover and let rise in a warm place until double in size (about 1 hour). 

Line a large baking sheet with parchment paper; set aside. 

Punch down dough. Turn out onto a clean, dry work surface. Divide dough into 12 portions. Roll each portion on work surface in a circular motion until it forms a smooth ball. Place balls on the prepared baking sheet. Cover and let rest for 30 minutes. 

Preheat oven to 425. In a deep dish or pot slightly larger than each dough ball, stir together the 3 cups hot water and the baking soda. Using a slotted spoon, lower balls, one at a time, into baking soda mixture for 10 seconds. Remove balls and place on paper towels to blot the bottoms dry. Arrange a 1 1/2 to 2 inches apart on the prepared baking sheet. 

In a small bowl combine egg yolk and the 1 tablespoon water. Brush dough balls with egg yolk mixture and, if desired, sprinkle with coarse salt. Bake about 10 minutes or until deep golden brown. Cool on wire rack. 


Tuesday, September 17, 2013

Very Basic Biscotti

If you know me, then you know I absolutely have to have coffee in the morning. I feel like something is missing in my life if I don't have a good cup of coffee and biscotti before I head off to work in the morning. I'm used to buying biscotti from Costco, but I decided to try Rocco DiSpirito's biscotti recipe at home and it's absolutely DELICIOUS! It's a very basic recipe, but these crisp cookies are perfect to dip in your morning cup of coffee. I'll add some dried chopped cherries and slivered almonds next time for extra flavor and texture.


Biscotti
(Source: Rocco DiSpirito)

1/2 cup vegetable oil
3 eggs
1 cup sugar
1 tablespoon anise extract (I used Vanilla extract)
3 1/4 cups all-purpose flour
1 tablespoon baking powder

Preheat the oven to 375 degrees F. Grease cookie sheets or line with parchment paper. In a medium bowl, beat together the oil, eggs, sugar and anise flavoring until well blended. Combine the flour and baking powder, stir into the egg mixture to form a heavy dough. Divide dough into 2 pieces. Form each piece into a roll as long as your cookie sheet. Place roll onto the prepared cookie sheet, and press down to 1/2-inch thickness. Bake for 25 to 30 minutes, until golden brown. Remove from the baking sheet to cool on a wire rack. When the cookies are cool enough to handle, slice each 1 crosswise into 1/2-inch slices. Place the slices cut side up back onto the baking sheet. Bake for an additional 6 to 10 minutes on each side. Cookie slices should be lightly toasted.

Friday, September 13, 2013

Penne Alla Vodka

One of my favorite Italian pasta dishes is Penne Alla Vodka. I know it's pretty caloric, but it's also very hearty dish that is impossible to pass up. Plus, Dr. Sweetpea also loves this dish, so I decided to give it a try at home. Ree Drummond's recipes are always a win, and this recipes did not disappoint! So simple to make, and absolutely delicious :o)


Penne Alla Vodka
(Source: Ree Drummond)

1 pound penne
3 cloves garlic, minced
1 whole medium onion, chopped finely
3 tablespoons butter
2 tablespoons olive oil
1 cup vodka
1 (14-ounce) can tomato puree or tomato sauce
1 cup heavy cream
1 generous pinch red pepper flakes, plus more if needed
1/4 to 1/2 teaspoon salt
Freshly ground black pepper
Grated Parmesan, for serving

Cook the pasta according to package directions. Saute the garlic and onions in 2 tablespoons butter and the olive oil in a saucepan over medium heat until soft. Pour in the vodka, being careful if your stove has an open flame (remove the pan from the heat before adding). Cook and reduce for 2 to 3 minutes, then pour in the tomato puree. Stir the mixture until it's thoroughly combined, then reduce the heat to low. Pour in the heavy cream. Stir to combine, then turn heat to the lowest simmer possible. Sprinkle in the red pepper flakes and add salt and pepper to taste. Finally, stir in the remaining 1 tablespoon butter. Pour the drained pasta into the sauce and toss to combine. Sprinkle on the Parmesan, then sprinkle on more red pepper flakes if desired.

Monday, August 12, 2013

Shrimp and Grits

My mom absolutely LOVES grits; so to surprise her, I made Shrimp and Grits and the end result was AMAZING! It's creamy. spicy, flavorful, and has a subtle shrimp flavor but definitely not overwhelming. This will be my go-to recipe from now on for Shrimp and Grits.


Crook's Corner Shrimp and Grits
(Source: Southern Living)

2 cups water
1 (14-ounce) can chicken broth
3/4 cup half-and-half
3/4 teaspoon salt
1 cup regular grits
3/4 cup shredded Cheddar cheese
1/4 cup grated Parmesan cheese
2 tablespoons butter
1/2 teaspoon hot sauce
1/4 teaspoon white pepper
3 bacon slices
1 pound medium-size shrimp, peeled and deveined
1/4 teaspoon black pepper
1/8 teaspoon salt
1/4 cup all-purpose flour
1 cup sliced mushrooms  (I didn't add mushrooms in mine)
1/2 cup chopped green onions
2 garlic cloves, minced
1/2 cup low-sodium, fat-free chicken broth
2 tablespoons fresh lemon juice
1/4 teaspoon hot sauce
Lemon wedges

Bring first 4 ingredients to a boil in a medium saucepan; gradually whisk in grits. Reduce heat, and simmer, stirring occasionally, 10 minutes or until thickened. Add Cheddar cheese and next 4 ingredients. Keep warm.
Cook bacon in a large skillet until crisp; remove bacon, and drain on paper towels, reserving 1 tablespoon drippings in skillet. Crumble bacon, and set aside. Sprinkle shrimp with pepper and salt; dredge in flour.
Sauté mushrooms in hot drippings in skillet 5 minutes or until tender. Add green onions, and sauté 2 minutes. Add shrimp and garlic, and sauté 2 minutes or until shrimp are lightly brown. Stir in chicken broth, lemon juice, and hot sauce, and cook 2 more minutes, stirring to loosen particles from bottom of skillet.
Serve shrimp mixture over hot cheese grits. Top with crumbled bacon; serve with lemon wedges.

Tuesday, August 6, 2013

Lion House Dinner Rolls

These rolls are the BEST dinner rolls ever!!!


Lion House Dinner Rolls
(Source:: Lion House Cookbook)

2 cups warm water (110 - 115 degrees)
2 tablespoons dry yeast
2 teaspoons salt
1 egg
2/3 cup dry milk powder
1/4 cup granulated sugar
1/3 cup butter, melted
5 - 5 1/2 cups flour

In a large bowl, combine the yeast and water. Let stand 10 minutes. Add sugar, butter, salt, dry milk, 2 cups flour and egg. Beat together until very smooth. Add remaining flour gradually (about 1/2 cup at a time) until a soft but not sticky dough is formed. Knead the dough for at least five minutes if using an electric mixer and for at least 10 minutes if mixing the dough by hand. When the dough is smooth, supple and elastic, place it in a lightly greased large bowl covered with greased plastic wrap and let it rise until doubled. Separate the dough into two portions. Roll each section out to an 11X14-inch rectangle. Brush the top with melted butter. Using a pizza cutter or sharp knife, cut the dough into two pieces, the long way. Then slice the dough into five or six strips across so you end up with 10 to 12 small rectangles. Roll each small rectangle up like a snail and place on a silpat-lined or lightly greased baking sheet with the roll resting on its open edge. Repeat with the second portion of dough. Cover the rolls with lightly greased plastic wrap and let them rise until doubled. Bake at 375 degrees for 12-14 minutes until they are nicely browned.

*Note: I shaped my rolls into little balls instead of rolling them up. 


Sunday, July 28, 2013

The Best Homemade Cinnamon Raisin Bread

Now that I have a better handle on making yeast bread, I decided to tackle another bread recipe. Dr. Sweetpea loves Cinnamon Raisin Bread so I scoured the internet to find a simple recipe. There are tons of great recipes out there, but I decided to try the Betty Crocker recipe because of the simplicity and the great ratings.

Admittedly, I did tweak the recipe around quite a bit so I could use my handy bread maker. However, if you don't have a Bread Maker, I hope you don't mind getting your hands dirty to knead the dough :o)


Cinnamon Raisin Bread
(Source: Betty Crocker)

3 cups all purpose flour
1/4 cup sugar
1/2 tablespoon salt
1 package regular active dry yeast
1 cup water (110 - 115 degrees)
1/8 cup vegetable oil
1 egg
1/2 cup raisins
1 tablespoon vegetable oil
1/4 cup granulated sugar
1/2 tablespoon cinnamon
1 tablespoon butter, softened

In a small bowl, mix 1/4 cup sugar, dry yeast, and water. Set aside and let it get foamy for about 10 minutes. In the bread machine tin, pour in flour, salt, 1/8 cup vegetable oil, egg, and the foamy yeast mixture. 

Select the Dough setting on the bread machine and let it mix/knead all ingredients. After it's done mixing/kneading, let the dough rise in the machine for 1 hour.

After the dough rises for 1 hour, dump the dough onto a floured surface and gently push fist into dough to deflate. Knead raisins into the dough and roll dough out into 18x9 inch rectangle. Brush 1 tablespoon oil over rectangle. 

In a small bowl, mix 1/4 cup sugar and the cinnamon; sprinkle the rectangle with cinnamon-sugar mixture. Beginning at 9 inch side, roll up the rectangle. Pinch edge of dough into roll to seal. Press each end with side of hand to seal; fold ends under loaf. Place loaf, seam side down, in a greased 9x5 inch loaf pan. Brush oil over loaf. Cover; let rise in warm place about 1 hour or until dough has doubled in size. 

Move oven rack to lowest position; heat oven to 375 degrees Fahrenheit. Bake 30 to 35 minutes or until loaf is deep golden brown and sound hollow when tapped. Remove from pan to cooling rack. Brush butter over loaf; cool. 

Tuesday, July 23, 2013

Dinner Rolls

I finally baked perfect dinner rolls today! These rolls are super quick to whip up during the week, light, and perfect with a nice bowl of soup. 


Sweet Dinner Rolls
(Source: AllRecipes)

1/2 cup warm water (110 degrees Fahrenheit)
1/2 cup warm milk (110 degrees Fahrenheit)
1 egg
1/3 cup butter, melted
1/3 cup granulated sugar, softened
1 teaspoon salt
3 3/4 cup flour
1 (0.25 oz) package active dry yeast
1/4 cup butter, melted (optional)

Dissolve yeast and 1 tablespoon sugar in warm water, let sit for 10 minutes. Warm milk in saucepan until it bubbles, remove from heat, stir in remaining sugar and 1/3 cup butter until melted and cool to lukewarm. In a large bowl, combine yeast mixture, milk mixture, and egg. Stir in flour a little at a time and knead lightly on a lightly floured surface for about 8 minutes. Cover and let rise for 1 hour. Dust a clean countertop with flour. Punch down dough and divide in half. Roll each half into a 12 inch circle. Cut into 8 wedges. Roll up the wedges starting with the wide end. Place rolls on a greased baking sheet. Bake at 400 degrees Fahrenheit for 12-15 minutes or until golden brown. Brush tops with butter when they come out. 

Wednesday, June 19, 2013

Marzipan Cookies

Ok, so I have a confession to make...I woke up earlier this morning so I can post about these phenomenal cookies before I head off to work in a little bit. I'm feeling a little frazzled because I'm making coffee, picking out my clothes, and doing my hair and makeup while trying to finish this post. These cookies are SOOOOOO good that I couldn't even wait until I get home after work to share this fantastic recipe with my readers.

These cookies are a must try if you're a huge fan of almonds like I am...perfectly almondy (is that a word?), crunchy on the outside, soft on the inside, and simply irresistible. I absolutely highly recommend you go to the grocery store today to bake these little gems.


Marzipan Cookies
(Source: Field to Fork Restaurant)

14 ounces almond paste*
1 cup sugar**
1/2 teaspoon salt
1/3 cup egg whites (2 eggs)
1 1/2 cups sliced almonds

Powdered sugar for garnish

Warm the almond paste in the microwave until pliable, 1 to 2 minutes. Cool slightly if needed, then break up into small pieces and put in a food processor. Add sugar, salt and egg whites and process until smooth. Pour almonds into a large, shallow bowl. Lightly oil or water your hands. Roll dough into 1-inch balls, then drop in the plate of almonds and roll to coat. Preheat oven to 350 degrees. Set cookies on parchment-lined cookie sheets about 1 inch apart. Cookies will spread just slightly. Bake in preheated oven 12 to 16 minutes or until light golden on top and just browned on the bottom. Remove from oven and cool, then sprinkle with powdered sugar.

* I used 2 (8 oz) cans of almond paste. Also, do not use almond cake and pastry filling. 
** I think the next time I make these cookies, I'll cut the sugar down to 3/4 cup since the almond paste is already a little on the sweet side. 


Sunday, June 9, 2013

Amazing Buttermilk Biscuits

These biscuits are AMAZING! I know it's so bizarre to have cake flour as one of the ingredients, but trust me...it's worth it! I used the Neely's biscuit recipe, but I substituted one cup of flour with cake flour. Little did I know these biscuits would turn out to be the best Buttermilk Biscuits I've made to date. 


Buttermilk Biscuits
(Adapted from: The Neely's)

1 cup all purpose flour
1 cup cake flour
1/2 teaspoon baking soda
1 1/2 teaspoons baking powder
1 teaspoon salt
8 tablespoons ice cold butter
3/4 cup buttermilk

Preheat oven to 475 degrees F. Slice butter and put on a plate in the freezer. Sift the dry ingredients together into a bowl. Cut in the butter with a pastry cutter or a fork until it looks like coarse sand. Add the buttermilk and continue to cut the dough together. Turn out onto a floured surface and gently bring together. Gently press the dough into a rectangle until it is between 1/2 and 3/4-inch thick. Use a round cutter that has been floured to cut the biscuits. Place in the freezer for at least 20 minutes. Remove biscuits from freezer and place on parchment paper on a baking sheet so they are touching each other. Bake for 20 minutes. Remove from the oven and serve with spiced butter.

Monday, May 27, 2013

Celebrating a 2 year anniversary with a double dose of chocolate

This weekend marks the 2 years that Dr. Sweetpea and I have been together. When I first met him, it was two years after I graduated from college, extremely young, and trying to figure out the path I wanted to take career wise. Then there was Dr. Sweetpea....older, sophisticated, wiser, had his life together, and more "adult" than I was at that point in time. I remember being extremely nervous on our first date, like palms sweating, brain running a million miles per minute, and heart pounding so hard that I thought it was going to burst out of my chest. Thankfully, I didn't pass out on our first date, and had a wonderful time together. Fast forward 2 amazing years, and we're still going strong :o)

A couple days ago, I asked Dr. Sweetpea if he wanted me to bake anything special for him since it's our 2 year anniversary. I was preparing myself to bake this ginormous cake, but he simply said he wanted double chocolate chip cookies! So I scoured the internet to find double chocolate chip cookie recipes, and came across this gem of a recipe from Nestle. It's absolutely divine fresh out of the oven, and perfect with your morning cup of coffee the next day.


Double-Chocolate Dream Cookies
(Source: Nestle - Verybestbaking.com)

2 1/4 cups all-purpose flour
1/2 cup baking cocoa powder
1 teaspoon baking soda
1/2 teaspoon salt
1 cup (2 sticks) butter or margarine, softened
1 cup packed brown sugar
3/4 cup granulated sugar
1 teaspoon vanilla extract*
2 large eggs
2 cups (12-oz pkg) Semi-Sweet Chocolate Morsels

Preheat oven to 375° F. Combine flour, cocoa, baking soda and salt in a small bowl. Beat butter, brown sugar, granulated sugar and vanilla extract in a large mixing bowl until creamy. Beat in eggs for about 2 minutes or until light and fluffy. Gradually beat in flour mixture. Stir in morsels. Drop by rounded tablespoon onto ungreased baking sheets. Bake for 8 to 10 minutes or until cookies are puffed. Cool on baking sheets for 2 minutes; remove to wire racks to cool completely.

*I think the next time I bake these cookies, I'll replace the vanilla extract with peppermint extract to make mint chocolate cookies or raspberry extract for chocolate raspberry cookies.

Sunday, May 19, 2013

Spicy Chicken Chipotle Pasta

One of my favorite things to order at Cheesecake Factory is the Spicy Chicken Chipotle Pasta. I absolutely love the spicy/sweet/smokey flavor combo, and have been searching for a recipe similar to my favorite dish. Unfortunately, Cheesecake Factory doesn't share their recipes, but many people have tried to replicate it. I found a recipe a few weeks ago that sounded fantastic and gave it a try. It's not exactly like the stuff you get at the restaurant, but it's pretty close!


Spicy Chicken Chipotle Pasta
(Source: JyotisKitchen.com)

STEP ONE:
Chicken marinade:   Mix all together in Ziploc bag and refrigerate for at least 4 hours.
2 chicken breasts or 4 chicken tenders, cut into bit sized pieces.
4 tablespoons honey
1 tablespoon lemon juice
2 tablespoons olive oil
1 tsp salt
1 tsp ground pepper

STEP TWO:
Roast 10-12 sticks of asparagus seasoned well with olive oil, parmesan cheese, and pepper in an oven heated to 425 degress for about 15 minutes until tender. Then cut diagonally into 1 inch pieces.

STEP THREE:
1/2 red bell pepper, chopped
1/2 yellow bell pepper, chopped (if you don't have yellow, just cut a whole red bell, its just for looks!)
4 cloves, garlic finely chopped
1 pound piccolini (I used bowtie pasta)
1 can chipotle chilies in adobo sauce, grind the whole can in a food processor to make a sauce
3/4 cup frozen peas
1 medium onion, finely chopped
2 cups heavy cream
1 cup Parmesan cheese

In a large pasta pot, boil water for the pasta.  Once the water is boiling add a lot of salt to flavor the water.  Then add half the box of pasta.  Cook for 8-10 minutes until al dente and then drain well. Do not rinse the pasta. In a large saucepan, heat 3 tablespoons olive oil on high heat.  Add the chicken and the entire marinade to the saucepan and cook until golden brown.  Then remove the chicken from the saucepan and set aside. Add another 3 tablespoons of olive oil and sauté the onions and garlic for about two minutes.  Then add the bell pepper and stir fry for about four minutes. Once the bell pepper is slightly tender add 1/2 cup chipotle sauce, 2 cups heavy cream, and 1 cup Parmesan cheese.  Once you have mixed these ingredients in taste the sauce.  If you prefer a more spicy sauce add more chipotle sauce to taste. Once the sauce is to your liking add frozen peas, chopped roasted asparagus, chicken, and pasta.  Mix well and cook until peas are sweet and juicy.


Tuesday, May 14, 2013

Pear and Mascarpone Cheese Wrapped with Prosciutto and Balsamic Glaze

Several months ago, Dr. Sweetpea and I had an appetizer at an Italian restaurant which was absolutely mouthwatering delicious. It wasn't fried calamari, or fried ravioli, or even bruschetta. Actually. it was pears smeared with mascarpone cheese and wrapped with prosciutto. It sounds a bit bizarre, but it was really reaaaalllly good. I was able to recreate this it at home, and now I can eat this dish any day I want.

Super short post, but I'm also super tired :o( 


Pear and Mascarpone Cheese Wrapped with Prosciutto and Balsamic Glaze
(Source: Carlucci's)

Bosc Pears
Mascarpone Cheese
Prosciutto 
Reduced Balsamic Glaze 

Peel the pears and cut into fourths lengthwise. Pit the seeds of the pears by using a small melon baller. Smear about 1 tablespoon of mascarpone cheese on each pear. Wrap each pear/mascarpone piece with a thin slice of prosciutto. Set on a nice serving dish and drizzle balsamic glaze over the appetizers before serving. 


Sunday, May 12, 2013

Lime Meltaways

Ever since last week, I wanted to bake something with key limes since Dr. Sweetpea loves everything with key limes. I tried looking through all my cookbooks but none of the recipes really caught my eye. Then I   started browsing for citrus cookies online when I came across the Lime Meltaways by Martha Stewart. These cookies are very similar to Russian Tea Cookies but it doesn't contain nuts. The lime zest and lime juice adds the perfect amount of citrus flavor and tartness to the cookie. Overall, I thought these cookies were super light and a great cookie to have if you want that burst of citrus.


Lime Meltaways
(Source: Martha Stewart) 

3/4 cup (1 1/2 sticks) unsalted butter, room temperature
1 cup confectioners' sugar
Finely grated zest of 2 limes
2 tablespoons fresh lime juice
1 tablespoon pure vanilla extract
1 3/4 cups plus 2 tablespoons all-purpose flour
2 tablespoons cornstarch
1/4 teaspoon coarse salt

Put butter and 1/3 cup confectioners' sugar in the bowl of an electric mixer fitted with the whisk attachment, and mix on medium speed until pale and fluffy. Add lime zest and juice and vanilla, and mix until fluffy. Whisk together flour, cornstarch, and salt in a bowl. Add to butter mixture, and mix on low speed until just combined.Wrap dough in saran wrap and chill in refrigerator for 1 hour or overnight. Preheat oven to 350 degrees. Remove dough from refrigerator and shape the dough into 1 ½ - 2 inch balls. Space rounds 1 inch apart on baking sheets lined with parchment paper. Bake cookies until barely golden, about 13 minutes, rotating sheets halfway through. Transfer cookies to wire racks to cool slightly, 8 to 10 minutes. While still warm, toss cookies with remaining 2/3 cup sugar in a resealable plastic bag. Cookies can be stored in airtight containers at room temperature up to 2 weeks.


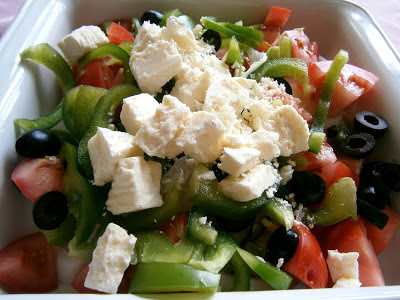
Greek Salad

Happy Mother's Day to all the mothers out there! Since today is a day for my mom to kick back and relax, I decided to make her favorite salad. My mom absolutely loves Greek Salad because it's so light and refreshing. Plus, it's so simple to throw together in a few minutes. I've been using Ina Garden's recipe for a few years, and it can't be beat. I absolutely love the salad dressing for this salad because it perfectly enhances the salad and doesn't drown in dressing. If you're looking for a quick and refreshing salad, then this is the one try!


Greek Salad 
(Source: Ina Garden)

1 hothouse cucumber, unpeeled, seeded, and sliced 1/4-inch thick
1 red bell pepper, large-diced   (I just used all green peppers)
1 yellow bell pepper, large-diced
1 pint cherry or grape tomatoes, halved   (I just chopped some regular tomatoes)
1/2 red onion, sliced in half-rounds
1/2 pound feta cheese, 1/2-inch diced (not crumbled)
1/2 cup calamata olives, pitted

For the vinaigrette:
2 cloves garlic, minced
1 teaspoon dried oregano
1/2 teaspoon Dijon mustard
1/4 cup good red wine vinegar
1 teaspoon kosher salt
1/2 teaspoon freshly ground black pepper
1/2 cup good olive oil

Place the cucumber, peppers, tomatoes and red onion in a large bowl. For the vinaigrette, whisk together the garlic, oregano, mustard, vinegar, salt and pepper in a small bowl. Still whisking, slowly add the olive oil to make an emulsion. Pour the vinaigrette over the vegetables. Add the feta and olives and toss lightly. Set aside for 30 minutes to allow the flavors to blend. Serve at room temperature.


Monday, April 29, 2013

Macaroni Salad

When the weather is warm, and I can smell food on the barbecue miles away, I have an intense craving for delicious macaroni salad. I'm not talking about the stuff you find at the deli and you wonder how long it has been sitting in the deli case. I'm talking about homemade macaroni salad that has the perfect amount of vegetables, mayonnaise, and al dente macaroni. There are a ton of macaroni salad recipes around the internet, but I don't like sweet relish or pickles in my macaroni salad. It's one of those things that I just don't like in macaroni salad, so I tend to stay away from recipes that include either of the two ingredients. So when I finally found a recipe on Food Network that didn't include pickles or sweet relish, I knew it was a must try!
I made this recipe for the first time tonight, and it definitely didn't disappoint.


Macaroni Salad
(Source: Food Network)

2 cups dry elbow macaroni, cooked, rinsed, and drained
1/3 cup diced celery (omitted because I didn't have celery at home)
1/4 cup minced red onion, soaked in cold water for 5 minutes, drained
1 tablespoon minced flat-leaf parsley
1/2 cup diced vine-ripened tomato
1/2 cup prepared mayonnaise
3/4 teaspoon dry mustard
1 1/2 teaspoons sugar
1 1/2 tablespoons cider vinegar
3 tablespoons sour cream
1/2 teaspoon kosher salt, plus more to taste
Freshly ground black pepper

In a large bowl combine the macaroni, celery, onion, parsley and tomato, if using. In a small bowl, whisk together the mayonnaise, mustard, sugar, vinegar, sour cream and salt. Pour the dressing over the salad and stir to combine. Season with salt and pepper to taste. Serve. Store covered in the refrigerator, for up to 3 days.


Sunday, April 28, 2013

Chocolate Sour Cream Bundt Cake

I had a craving for a decadent chocolate cake for the last few days. After browsing around the food blogosphere, I found one that had amazing reviews and decided to give it a try. It was so simple to whip together and took me all of 15 minutes before the batter went into the oven. The end result? It's the perfect amount of chocolate, and the cake is so light and fluffy. The only problem is I didn't grease my bundt pan well enough so my cake didn't come out in one whole piece.  This will definitely stay in my cake repertoire for years to come. 


Chocolate Sour Cream Bundt Cake
(Source: Sam Mogannam and Dabney Gough)

For the cake:
1 cup (2 sticks) unsalted butter, plus more for the pan
1/3 cup (1 ounce) cocoa powder
1 teaspoon kosher salt
1 cup water
2 cups (9 ounces) all-purpose flour, plus more for the pan
1 3/4 cups sugar
1 1/2 teaspoons baking soda
2 large eggs
1/2 cup sour cream
1 teaspoon pure vanilla extract

For the glaze:
4 ounces bittersweet chocolate, finely chopped
1 1/2 tablespoons agave nectar or corn syrup
1/2 cup heavy cream
1 1/2 tablespoons sugar

Make the cake:
Position a rack in the center of the oven and heat to 350°F (176°C). Butter and flour a 10- or 12-cup Bundt pan and set aside. In a small saucepan, combine the butter, cocoa powder, salt, and water and place over medium heat. Cook, stirring, just until melted and combined. Remove from the heat and set aside. Place the flour, sugar, and baking soda in a large bowl and whisk to blend. Add half of the melted butter mixture and whisk until completely blended (the mixture will be quite thick). Add the remaining butter mixture and whisk until combined. Add the eggs, one at a time, whisking until completely blended before adding the next egg. Whisk in the sour cream and vanilla until smooth. Scrape the batter into the prepared pan and bake until a toothpick inserted into the center of the cake comes out clean, 40 to 45 minutes. Let the cake cool in the pan for 15 minutes and then invert onto a rack. Let cool completely before glazing.

Make the glaze:
Just before glazing the cooled cake, place the chopped chocolate and agave nectar in a medium bowl and set aside. Combine the heavy cream and sugar in a small saucepan and put over medium heat. Stir constantly until the cream is hot and the sugar is dissolved. Pour the hot cream over the chocolate and whisk until melted and smooth. If the glaze is exceptionally runny, let it sit for a minute or so to thicken. Drizzle the glaze over the cooled cake, allowing it to drip and dribble down the sides.


Friday, April 26, 2013

Oatmeal Chocolate Chip Bars

If you've been reading my blog long enough, you know that Dr.Sweetpea's favorite cookies are Oatmeal Chocolate Chip Cookies. I already have two but very similar recipes on my blog, but I recently came across an OCC Bar recipe not long ago and finally gave it a try. Personally??? I love the bar version sooooooo much better!! It's quick to throw together and the cookies don't dry out after baking so it chewier longer :o)
This is probably one of the best bar cookie recipes...ever.


Oatmeal Chocolate Chip Bars 
(Source: www.whatmegansmaking.com)

1 cup unsalted butter, at room temperature
1 1/4 cups brown sugar
3/4 cup white sugar
2 eggs
1 teaspoon vanilla
2 cups flour
2 teaspoons baking powder
1/2 teaspoon salt
2 cups quick-cooking or old fashioned oats
1 1/2 cups chocolate chips

Preheat the oven to 375. In a mixing bowl, cream together the butter, sugars, eggs and vanilla. In a separate bowl, combine the flour, baking powder and salt. Gradually add the flour mixture to the mixing bowl and beat just until combined. Fold in the oats and chocolate chips. Spread in a rimmed 10x15 baking pan, using a spatula or your hands to press into place. Bake for 20 minutes, or until golden brown. Cool, but cut the bars while they are still somewhat warm, as a knife will go through them more easily.


Monday, April 15, 2013

Cheddar Bay Biscuits from Scratch!!

If you google Cheddar Bay Biscuits, you'll see there are so many recipes out there trying to duplicate the original recipe. Most of the recipes use a boxed baking mix such as Bisquick. I tried using Bisquick last year too, but the end result was not as good as the real thing. Then I found this recipe that blends cake flour and all purpose flour together. I was a little skeptical at first since I was let down last year. However, this recipe just blew me away! I personally love this sooooooooooooooo much better than the stuff at the restaurant! Don't believe me? Try for yourself :o)


Cheddar Bay Biscuits from Scratch
(Source: www.portuguesegirlcooks.com)

1 1/2 cups (7 1/2 ounces) all-purpose flour
1 1/2 cups (6 ounces) cake flour
1 tablespoon baking powder
1/2 teaspoon baking soda
1 teaspoon salt
2 teaspoons garlic powder
12 tablespoons (1 1/2 sticks) unsalted butter, softened and cut into 1/2-inch pieces
2 cups shredded cheddar cheese (about 4 1/2 oz)
1 1/2 cups buttermilk

Garlic Topping
4 tablespoons (1/2 stick) salted butter
2 cloves garlic, finely minced or through garlic press
1/2 teaspoon garlic powder
1 teaspoon dried parsley

Adjust oven rack to the upper-middle position, and preheat oven to 425 degrees. Line two baking sheets with parchment. In a large bowl, whisk both flours, baking powder, baking soda, salt, and garlic powder until combined. Add in the cubed butter and using your fingers, rub it into the flour mixture until it resembles coarse meal. Add in the shredded cheese and mix to combine. Add in the buttermilk and mix until combined. Using a 1/4 measuring spoon, scoop the biscuit mixture onto the prepared baking sheets. Bake the biscuits for 10 minutes, and them remove and brush with butter mixture, and then bake for an additional 5 minutes until the tops are puffed and golden brown. Allow biscuits to cool on baking sheet for 5 minutes then transfer to a wire rack. Serve at room temperature or while slightly warm.

Butter Topping
In a small saucepan, combine butter and minced garlic, heat on medium heat until the butter is melted and garlic is fragrant about  1 to 2 minutes. Add in the garlic powder and dried parsley, and stir to combine. Set aside.


Monday, April 8, 2013

Bacon Potato Salad

Whenever Spring rolls around, I have this intense craving for potato salad. I'm not talking about the deli potato salad you get at your local grocery store. I'm talking about the homemade potato salad that tastes so good that you can't stop eating. After looking at many different potato salad recipes, I finally decided to try the Bacon Potato Salad recipe and I have no regrets. This potato salad is absolutely phenomenal! The vinegar and mustard flavors aren't too overpowering and the bacon added a slightly smokey flavor.  If you're looking for a different potato salad recipe, this is a must try!


Bacon Potato Salad
(Source: Cole's Restaurant)

1 pound Yukon gold potatoes (I used red potatoes)
3 strips bacon, coarsely chopped
1/4 cup plus 3 tablespoons mayonnaise, or more to taste
1 heaping tablespoon Dijon mustard, or more to taste
1 heaping tablespoon cider vinegar, or more to taste
1/4 teaspoon smoked salt
1/4 teaspoon kosher salt
1/8 teaspoon freshly ground black pepper
2 green onions, chopped
1 heaping tablespoon chopped fresh thyme
1 heaping tablespoon chopped fresh parsley

In a medium saucepan, add the potatoes and enough water to cover the potatoes by 1 inch. Bring the pan to a simmer and cook until the potatoes are tender (a paring knife should easily pierce the potato), about 25 minutes. Remove from the heat, drain the potatoes and set aside until cool enough to handle. While the potatoes are cooking, fry the bacon in a medium skillet over medium heat until crisp, 8 to 10 minutes. Remove from heat and drain the bacon onto a paper towel-lined plate. Save 1 tablespoon bacon grease and set aside in a warm place (discard the rest, or save for another use). In a small bowl, whisk together the mayonnaise, mustard, cider vinegar, smoked salt, kosher salt and pepper. Taste and adjust the dressing as desired. Set aside. Dice the potatoes into half-inch cubes and place in a large bowl. Stir in the warm bacon fat until combined. Fold in the dressing, bacon, green onions, thyme and parsley. Taste the salad and adjust the seasoning if desired. Cover and chill the potato salad before serving.


Sunday, April 7, 2013

The Best French Silk Pie Ever!

Who doesn't love French Silk Pie?? It's chocolatey, creamy, light as air, and the perfect treat to have for dessert. I'll be honest, I've never made French Silk Pie until today, mostly because I always thought it would labor intensive and complicated to make. Plus, a lot of the recipes require raw eggs. After a little digging, I found a recipe that cooks the eggs with sugar to make a custard base. I was a little skeptical at first because I thought the pie filling would be dense, but I was oh soooooooo wrong! I think this pie is as good, if not better than the stuff you get at bakeries!


French Silk Pie
(Source: Taste of Home)

1 sheet refrigerated pie pastry
2/3 cup sugar
2 eggs
2 ounces unsweetened chocolate, melted
1 teaspoon vanilla extract
1/3 cup butter, softened
2/3 cup heavy whipping cream
2 teaspoons confectioners' sugar
Whipped cream and chocolate curls, optional

Pre-bake pie crust on a 7 inch pie plate until golden brown. Cool Completely.
In a small saucepan, combine sugar and eggs until well blended. Cook over low heat, stirring constantly, until mixture reaches 160° and coats the back of a metal spoon. Remove from the heat. Stir in chocolate and vanilla until smooth. Cool to lukewarm (90°), stirring occasionally. In a small bowl, cream butter until light and fluffy. Add cooled chocolate mixture; beat on high speed for 5 minutes or until light and fluffy.
In another large bowl, beat cream until it begins to thicken. Add confectioners' sugar; beat until stiff peaks form. Fold into chocolate mixture. Pour into crust. Chill for at least 6 hours before serving. Garnish with whipped cream and chocolate curls if desired. Refrigerate leftovers.